Deploy NSX ALB for TKG Standalone

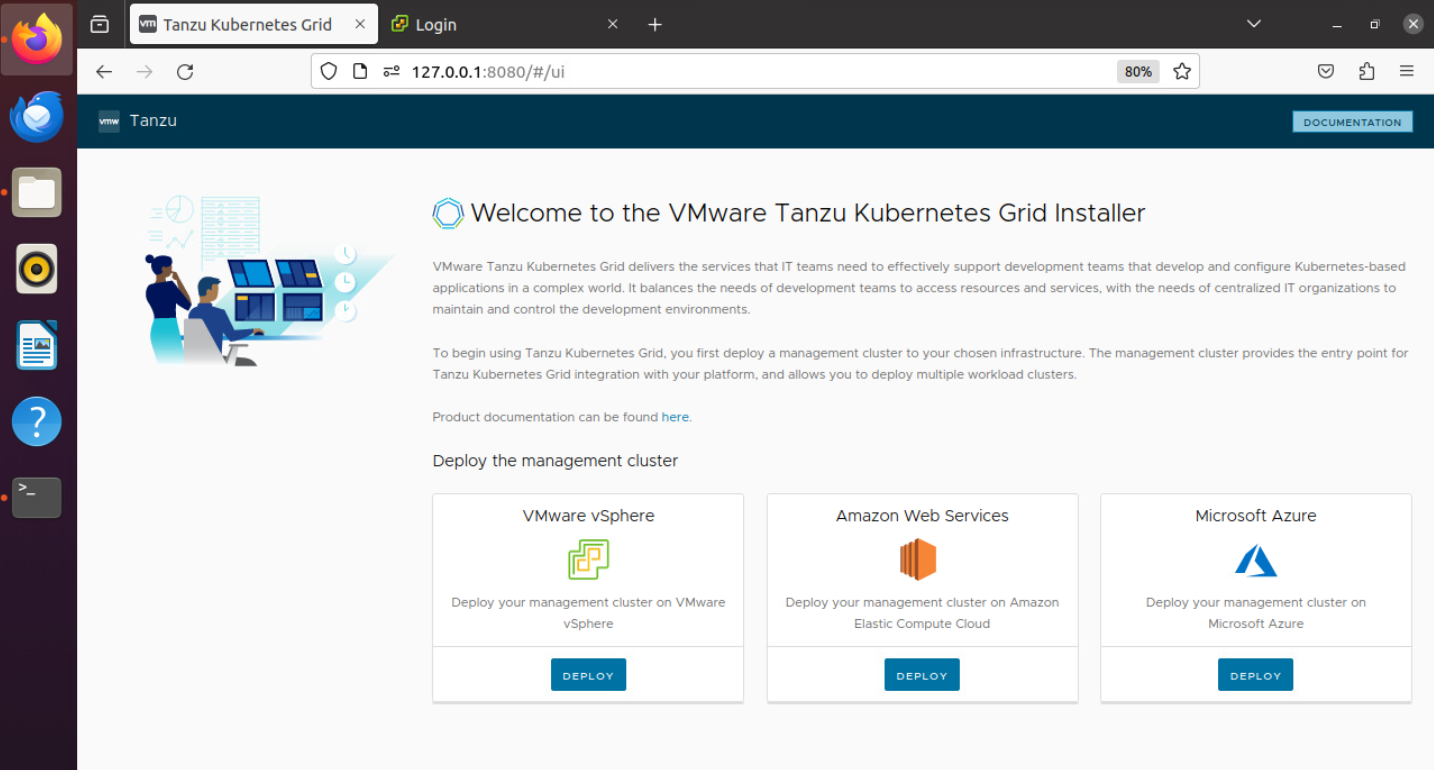
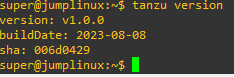
In previous articles we have seen how to create a standalone TKG cluster using NSX ALB as a loadbalancer, let’s see how to install and configure it for TKG.

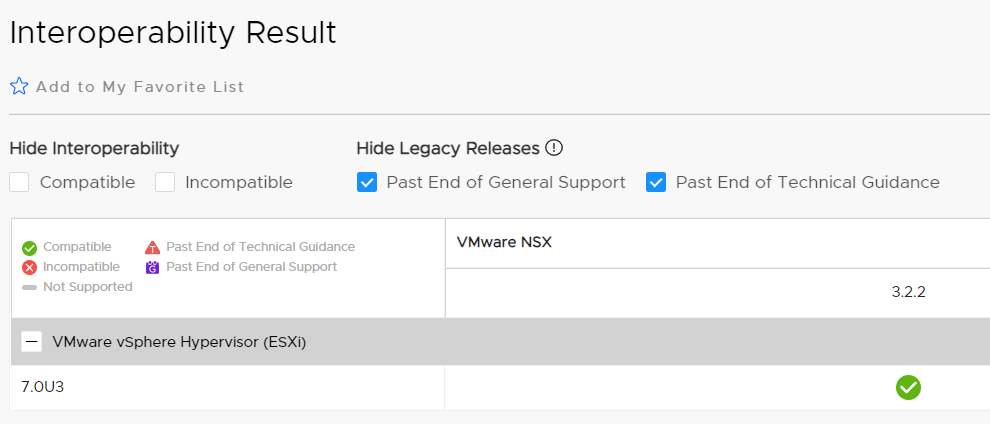
First we need to check which version is in compatibility matrix with the version of vSphere and TKG we are using.

In my case are vSphere 7.0u3 and TKG 2.4.

The check is necessary because not all ALB releases are compatible with vSphere and TKG, let’s look in detail at the matrix for the versions used.

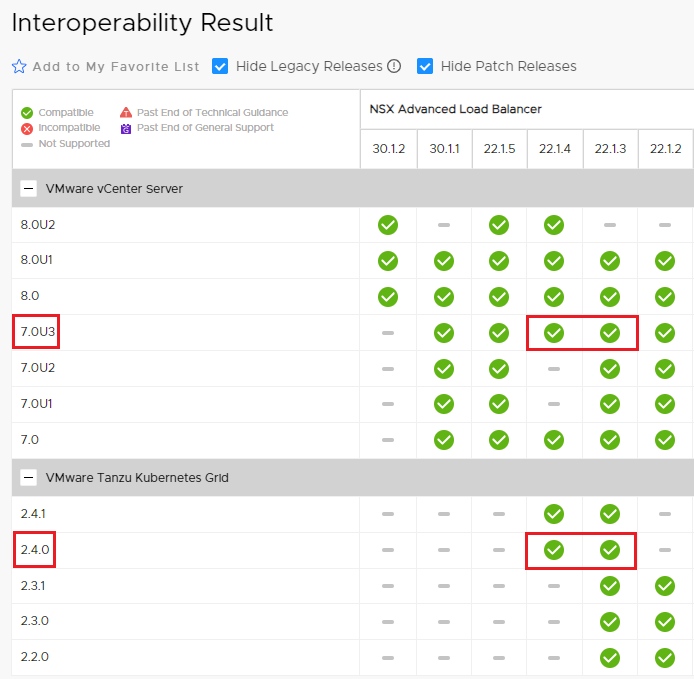
The VMware Product Interoperability Matrix is available at thisย link.

The versions of ALB that can be used are 22.1.4 and 22.1.3; I chose the most recent.

The latest patches should also be applied to Release 22.1.4.

The files to download from the VMware site are as follows:

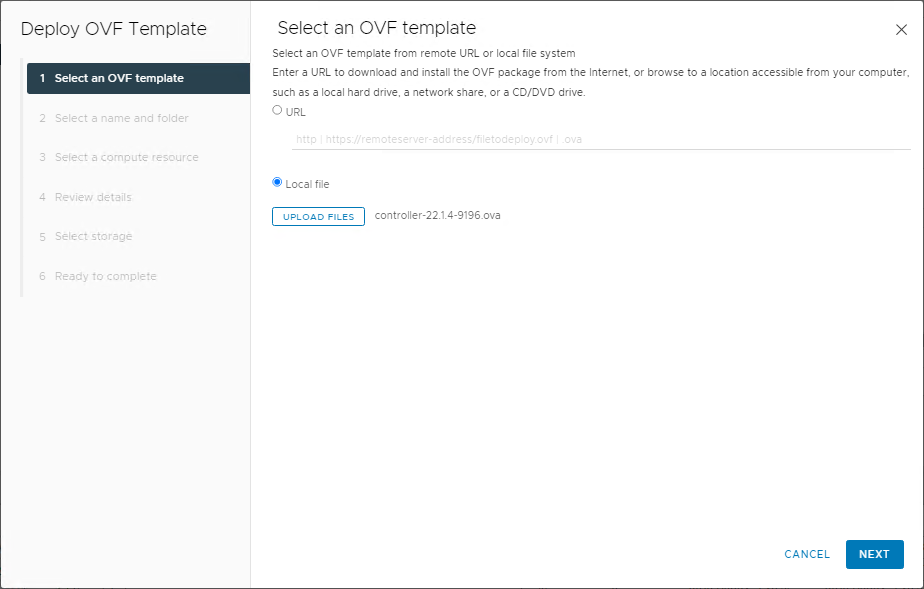
controller-22.1.4-9196.ova + avi_patch-22.1.4-2p6-9007.pkg

NOTE: Before starting the OVA deployment, verify that you have created the DNS records (A+PTR) for the controllers and the cluster VIP.

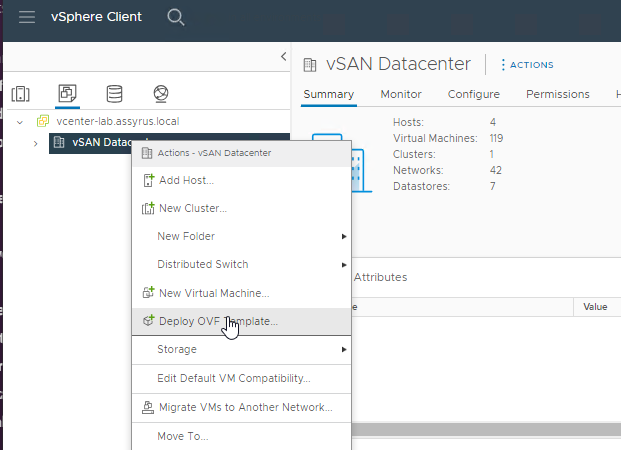
Start the deployment of the controller on our vSphere cluster.

Select the OVA file

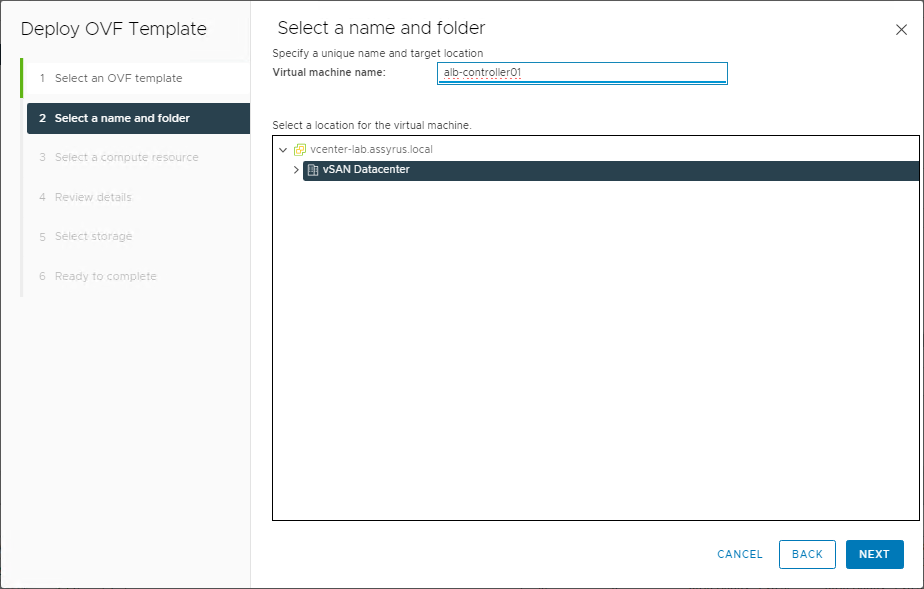
Name the VM and select the target Datacenter and Cluster

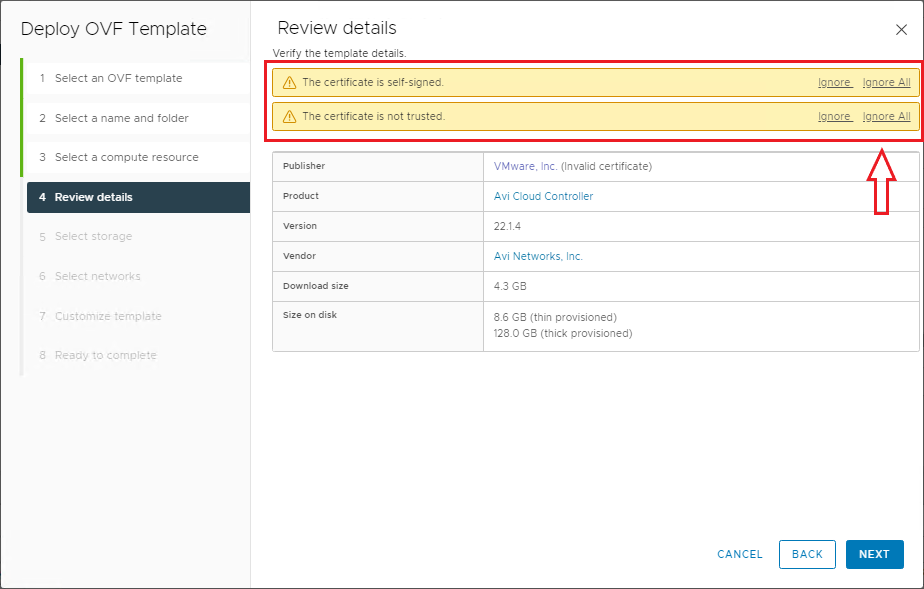
On summary ignore certificate warnings, next

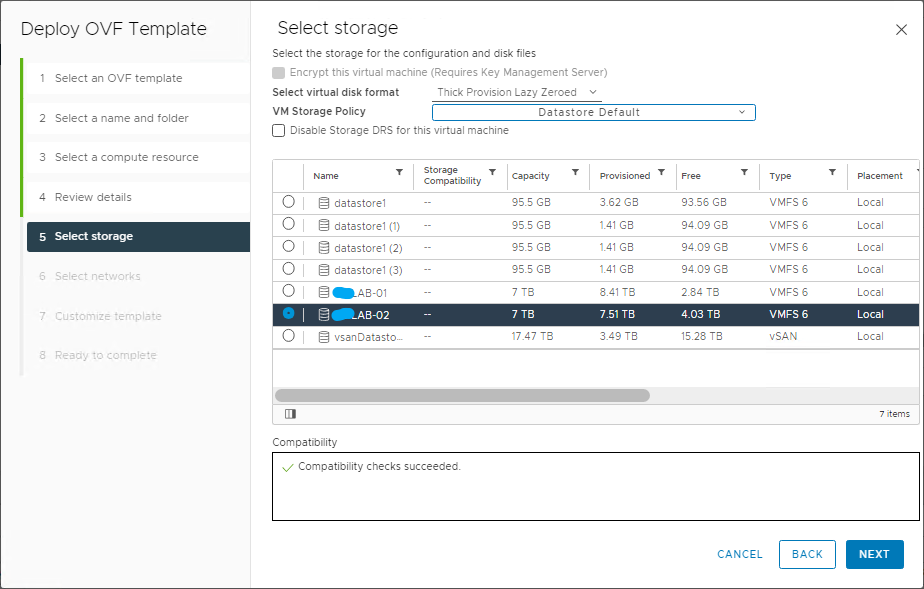
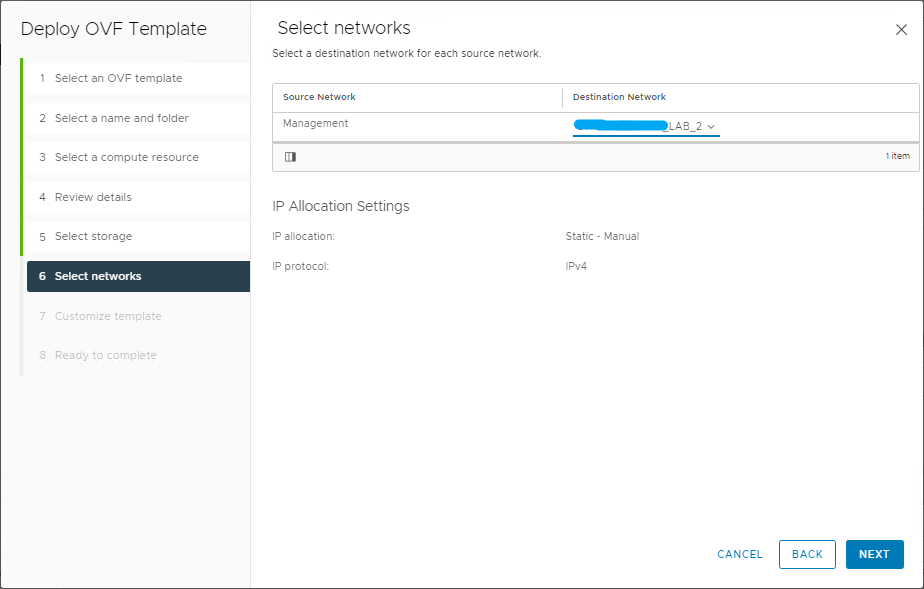
In the next steps, select the datastore and controller management network

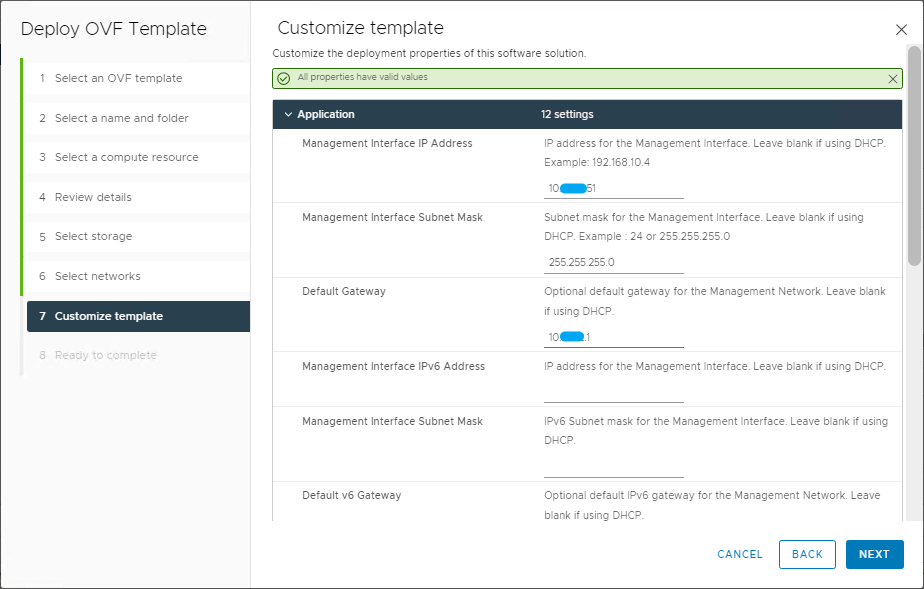
Now enter the settings for the controller management interface

Select FINISH to start deployment

Turn on the VM and wait for the services to be active (takes a while)

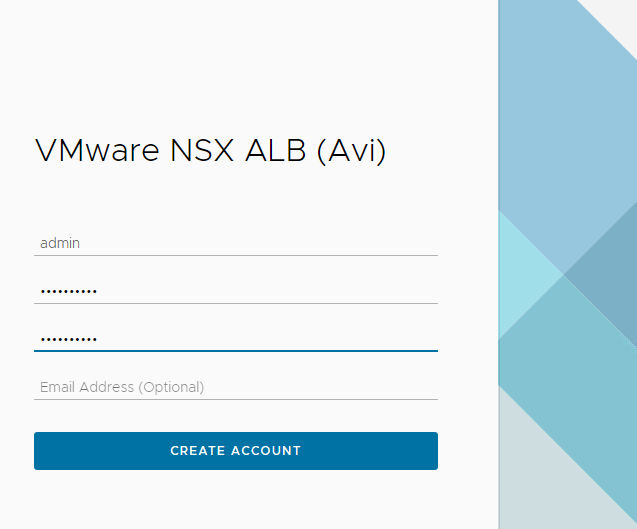
The first time you log in, you will need to enter the admin user password

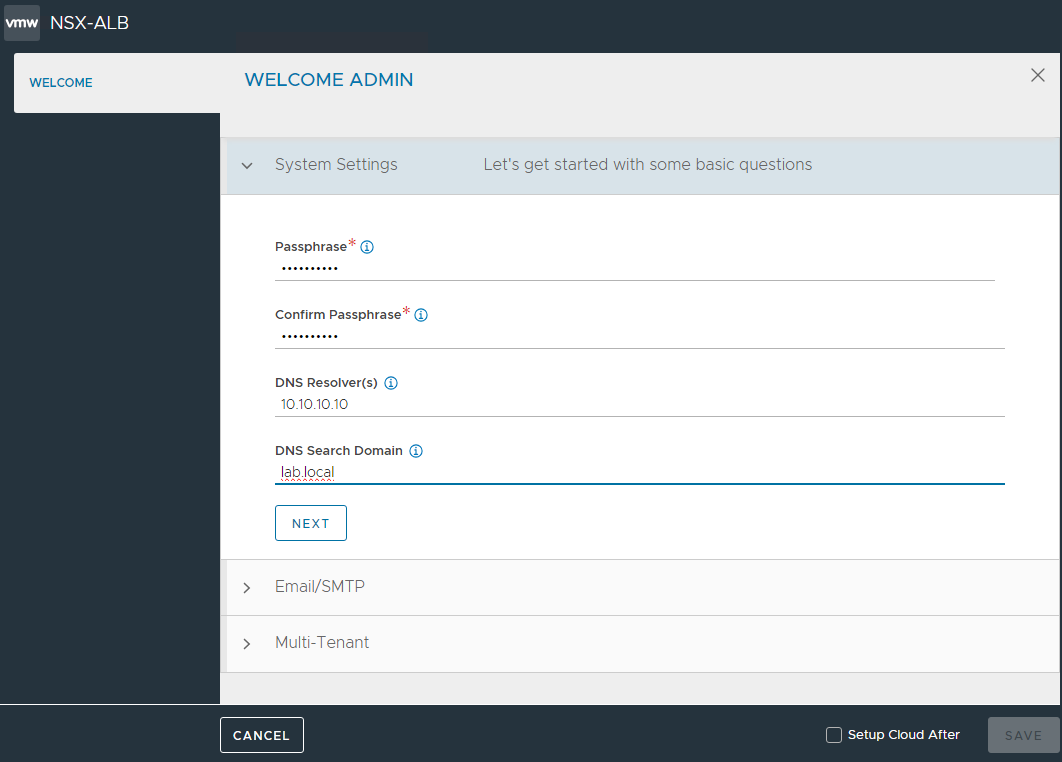
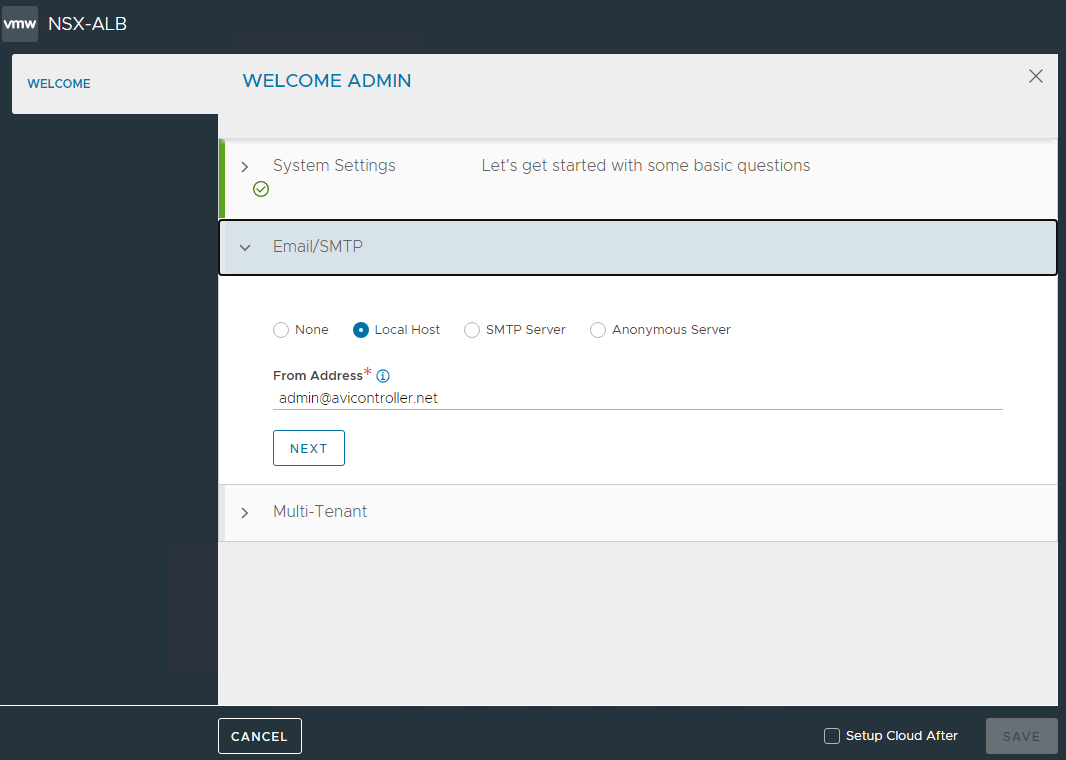
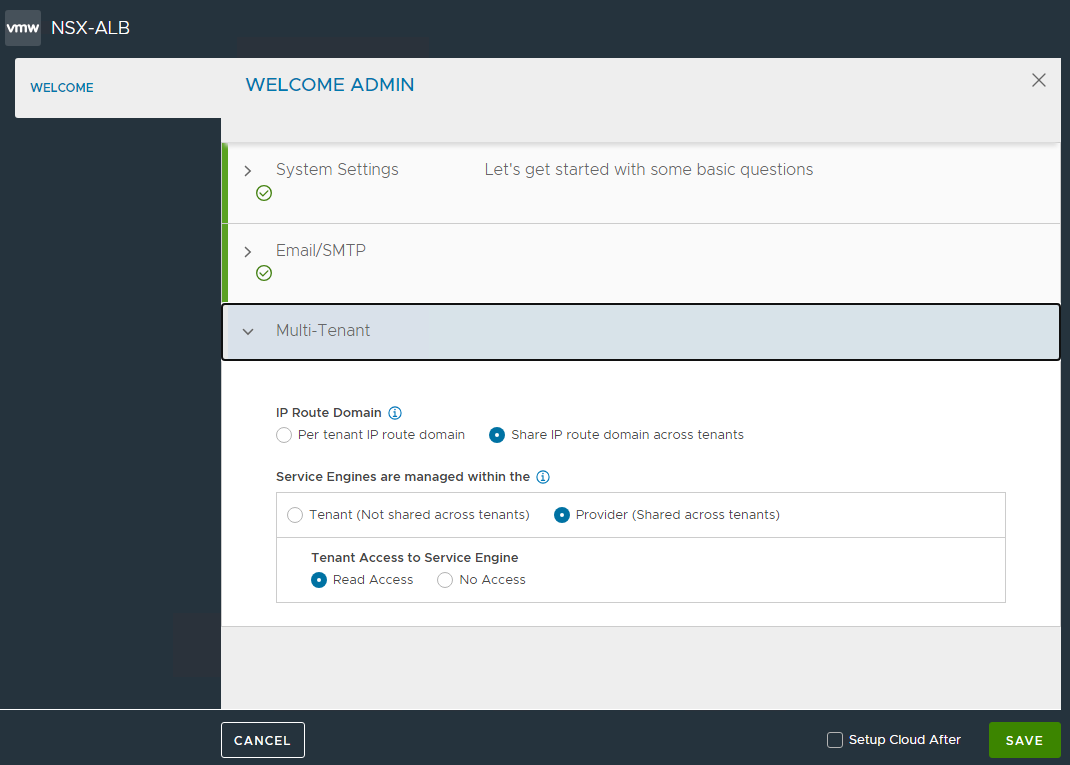
Enter the information necessary to complete the configuration and SAVE

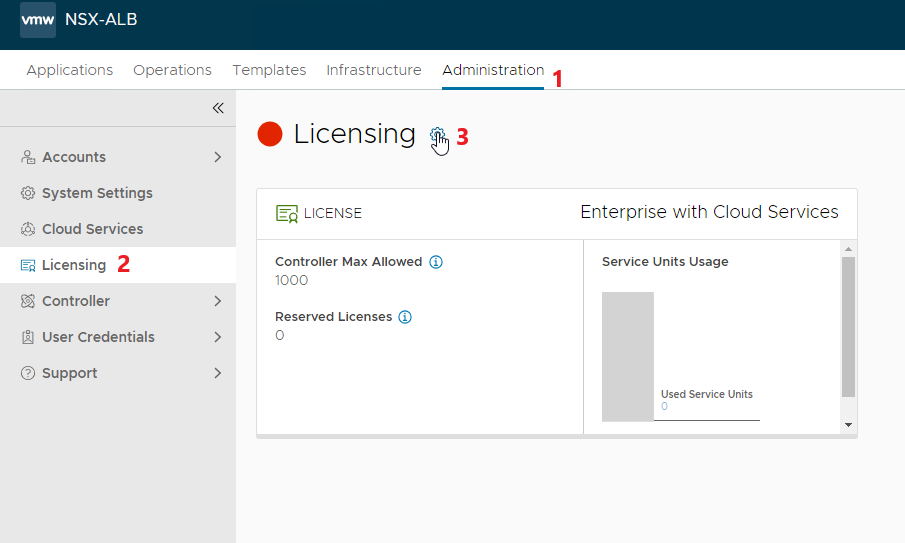
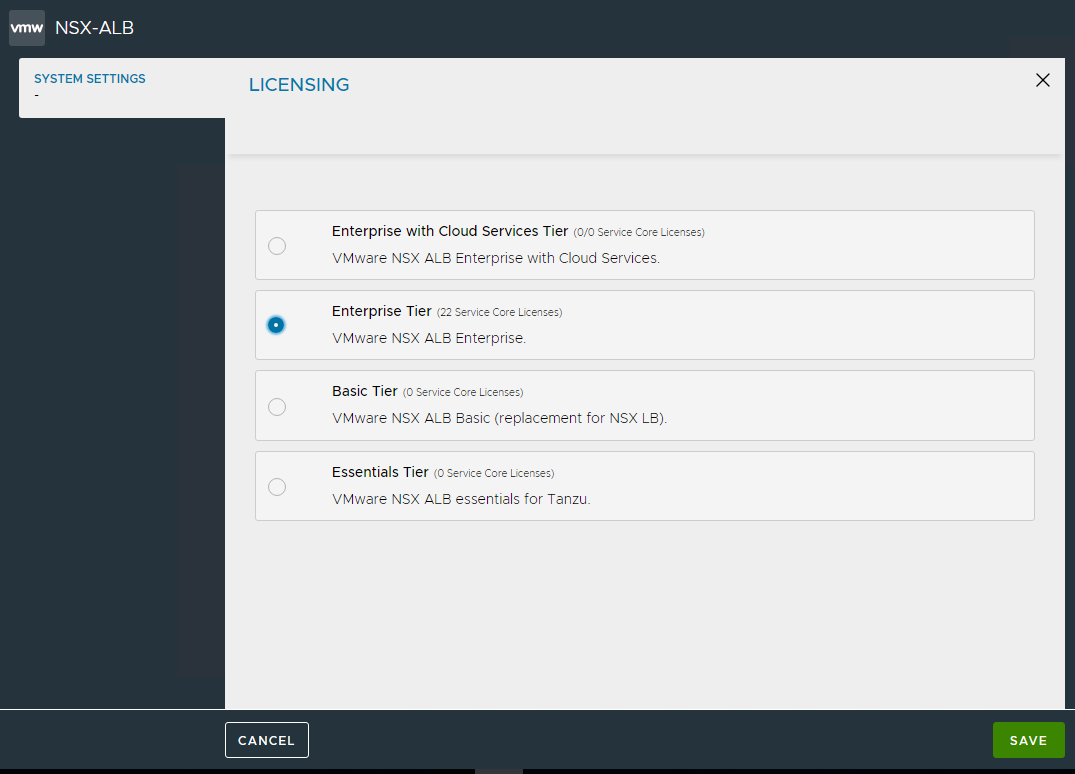
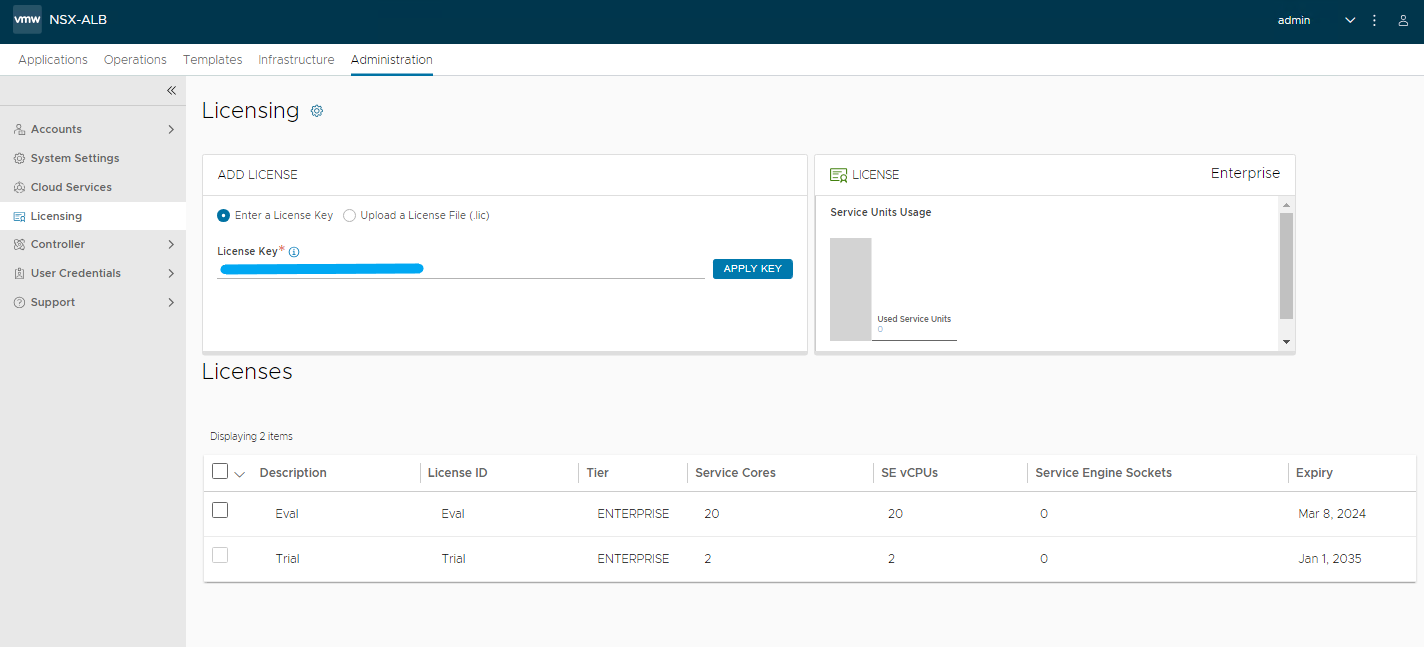
First we apply the type of license to use, for the lab I used the Enterprise with 1 month of EVAL

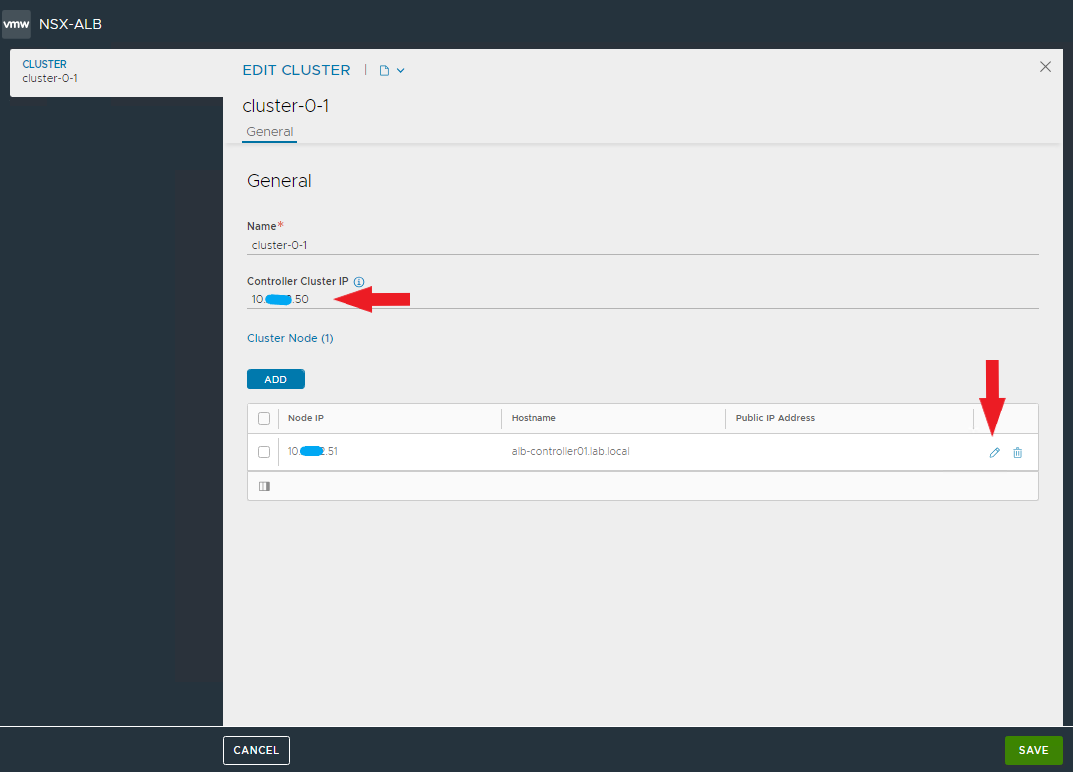
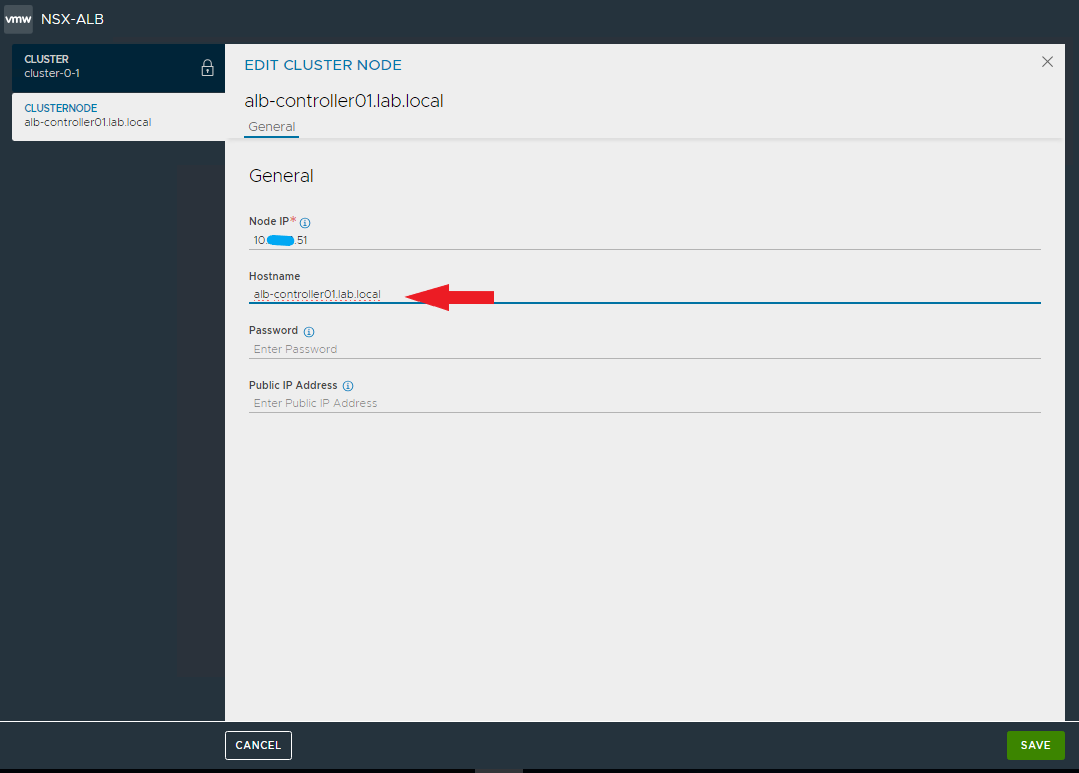
Change the cluster and node settings by entering the virtual address and FQDN, then SAVE.

NOTE: after saving the settings you will lose connectivity with the node for a few seconds

Connect to the controller using the VIP address

Apply the latest available patches

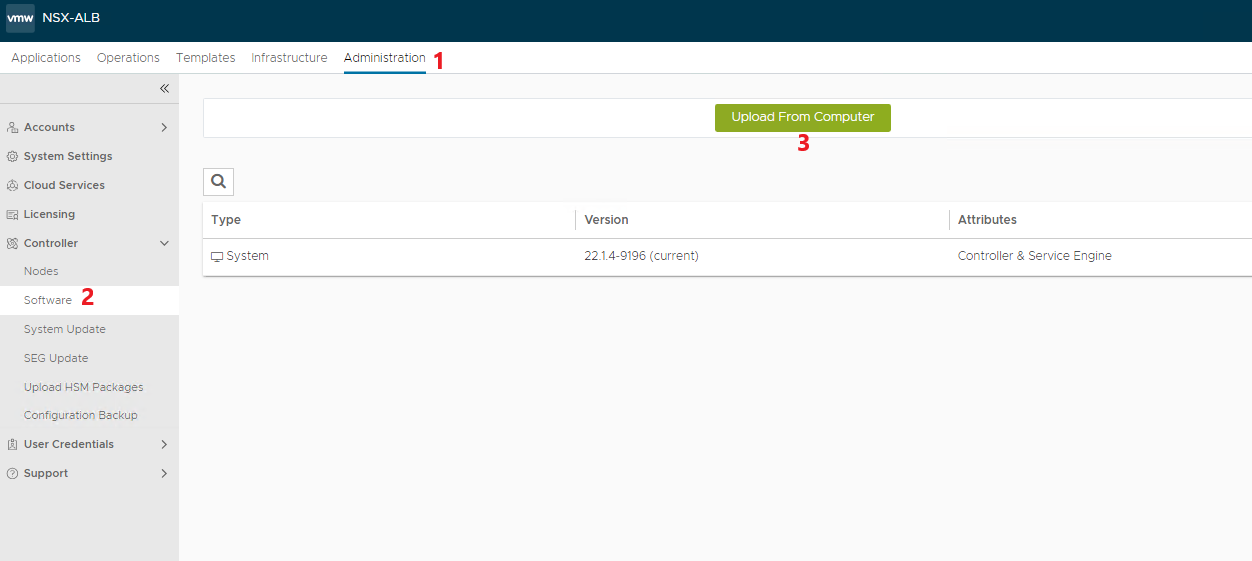
Select the previously downloaded file and upload it

Waiting for the upload to complete successfully
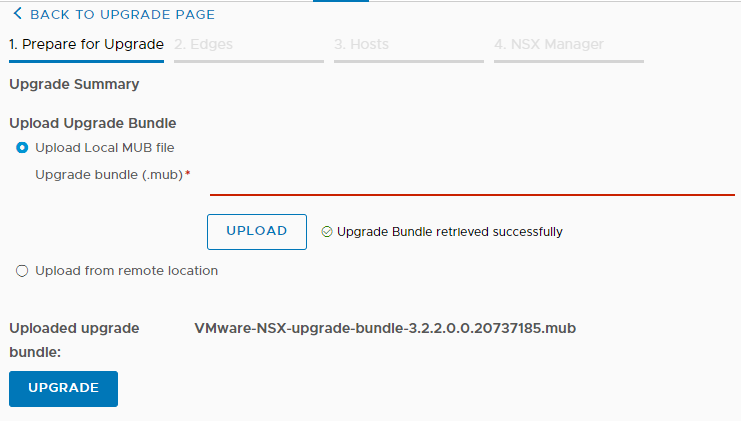
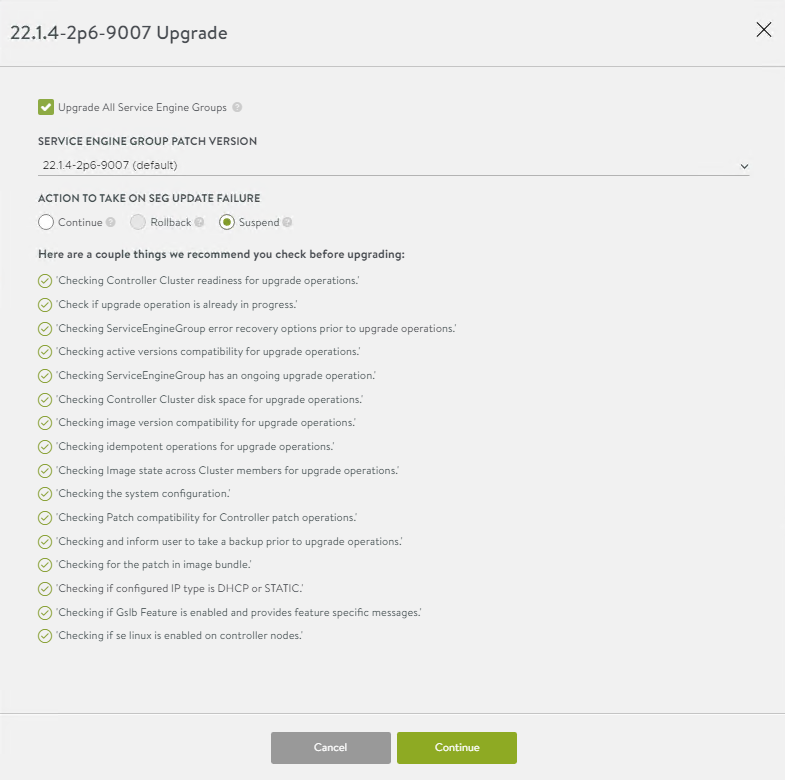
Start the upgrade

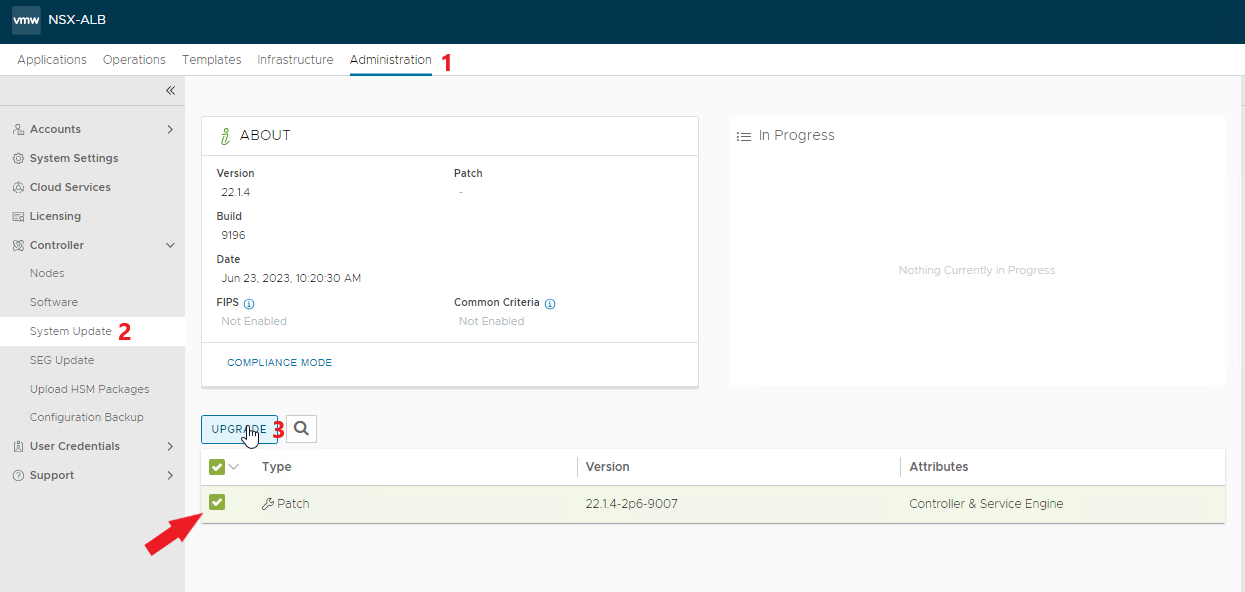
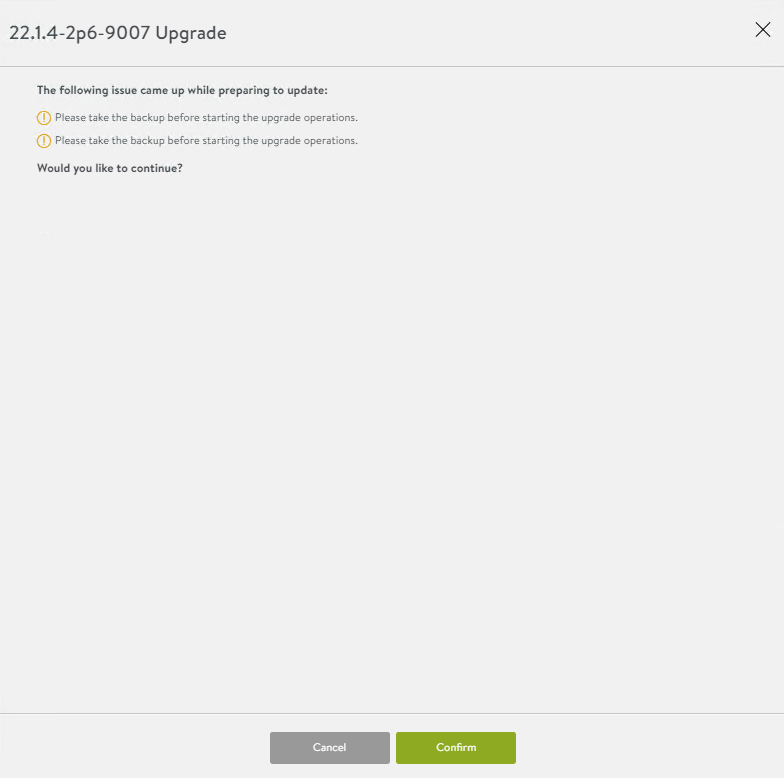
Leave the default settings and confirm

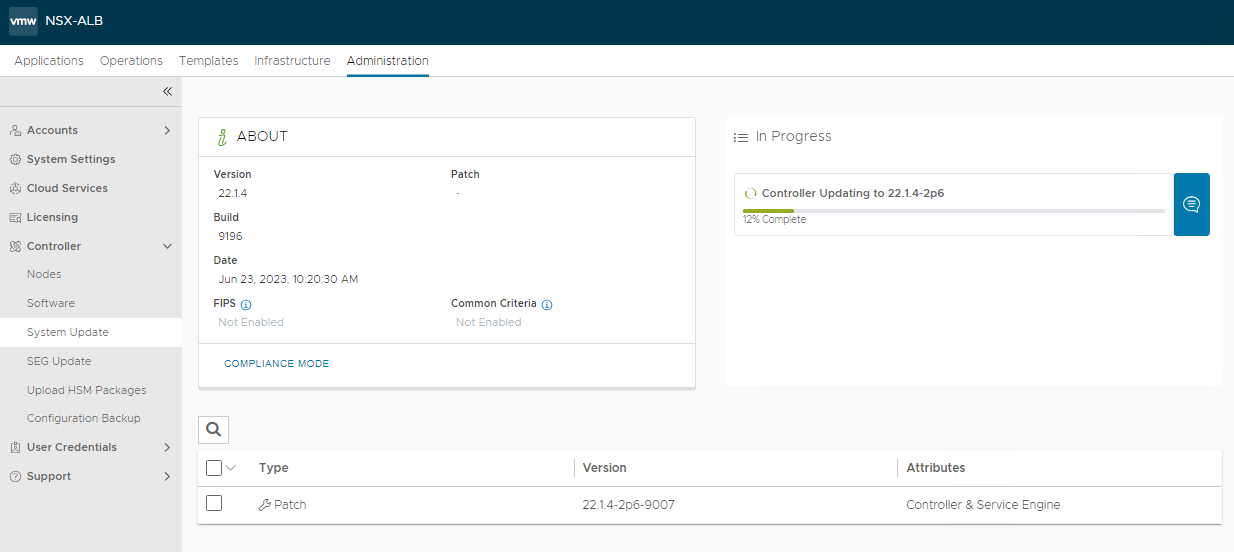
Follow the upgrade process, during the upgrade the controller will reboot
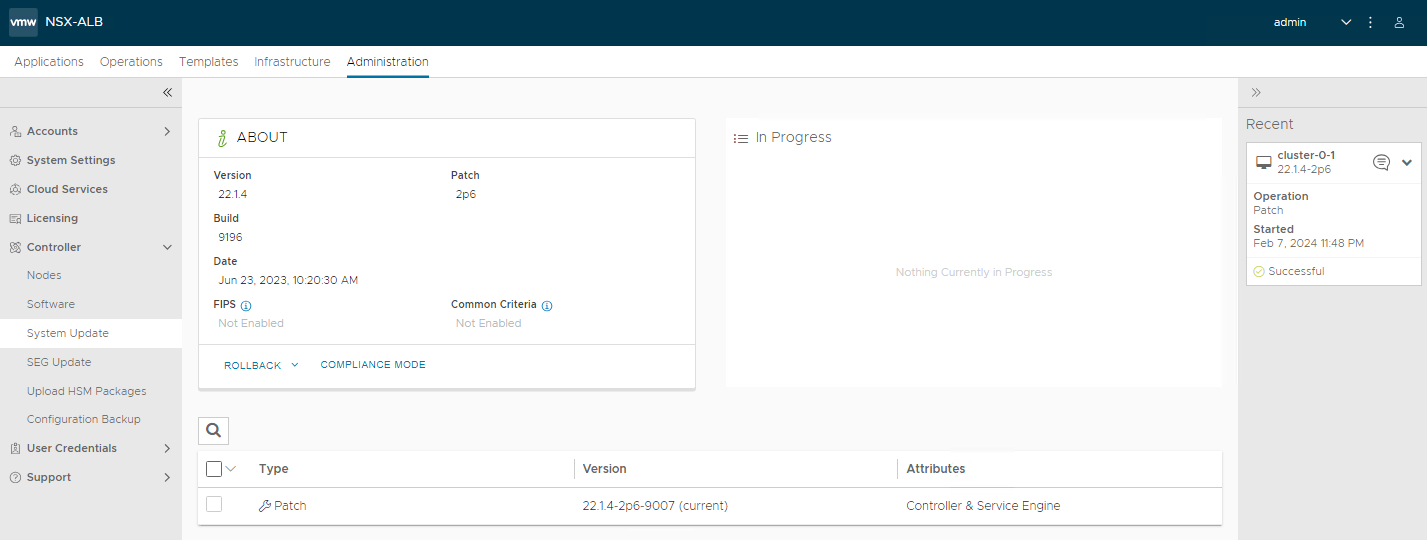
Patch applied!

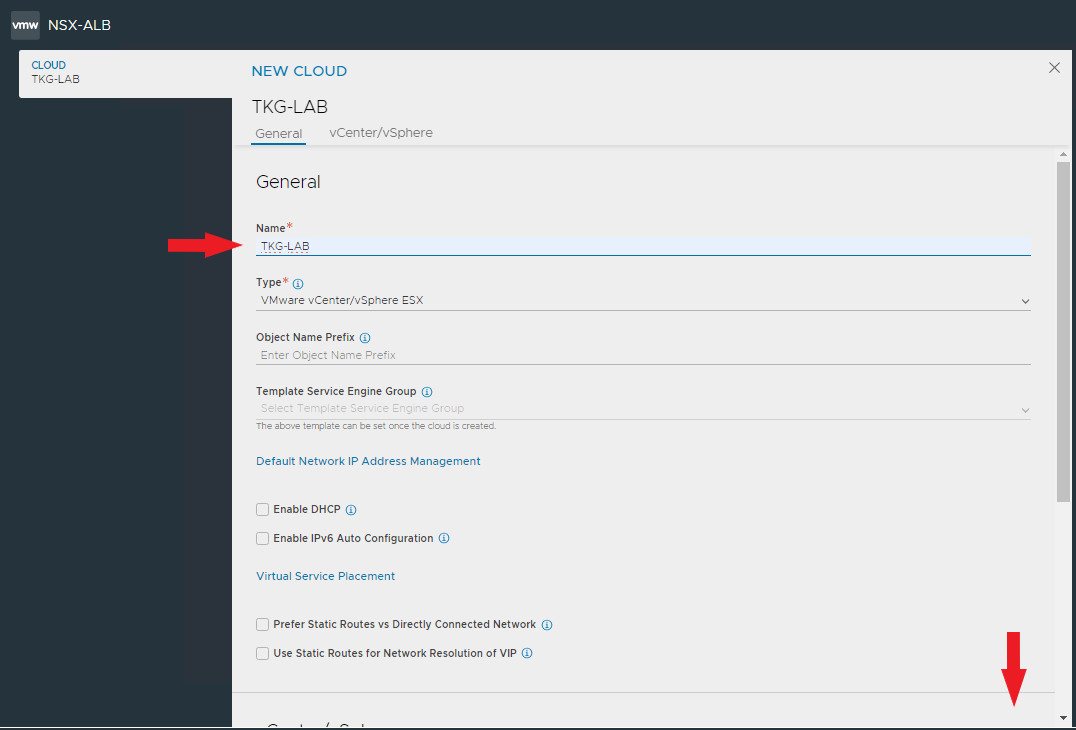
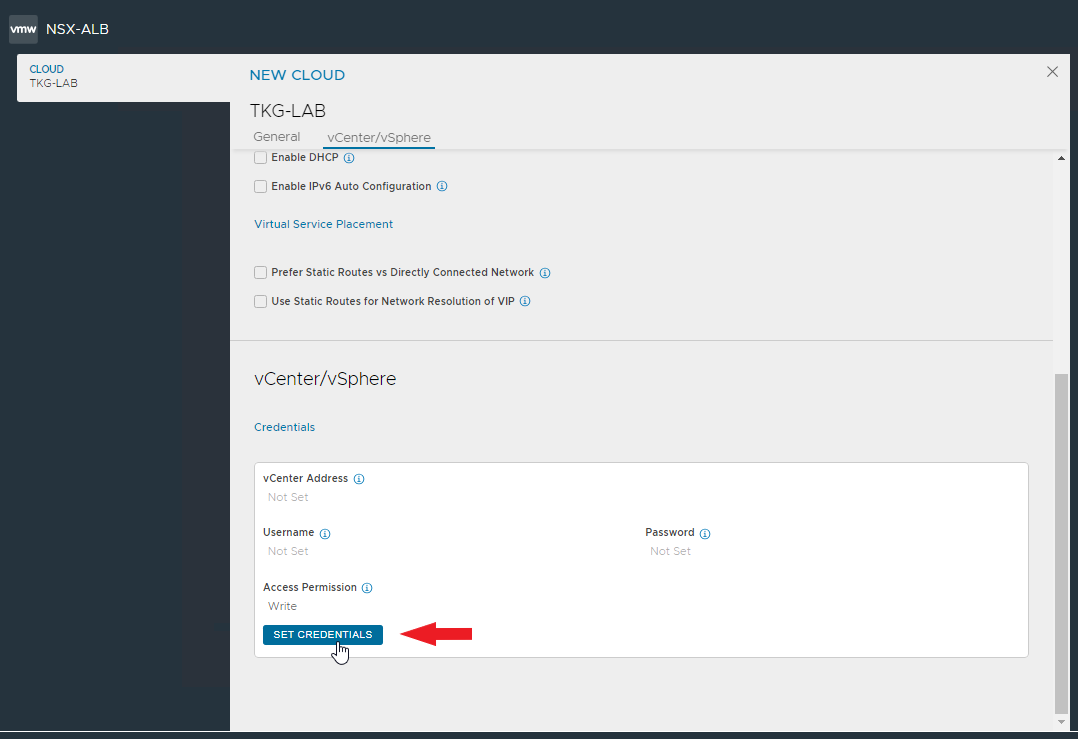
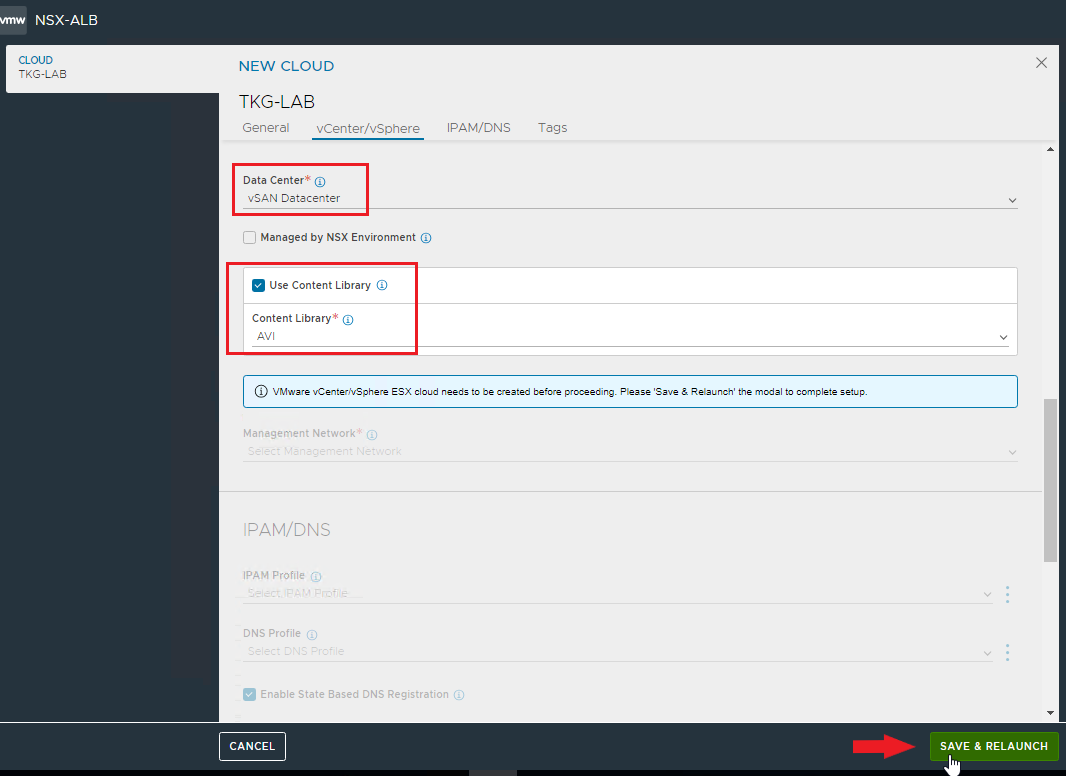
Create the Cloud zone associated with our vCenter for automatic deployment of Service Engines

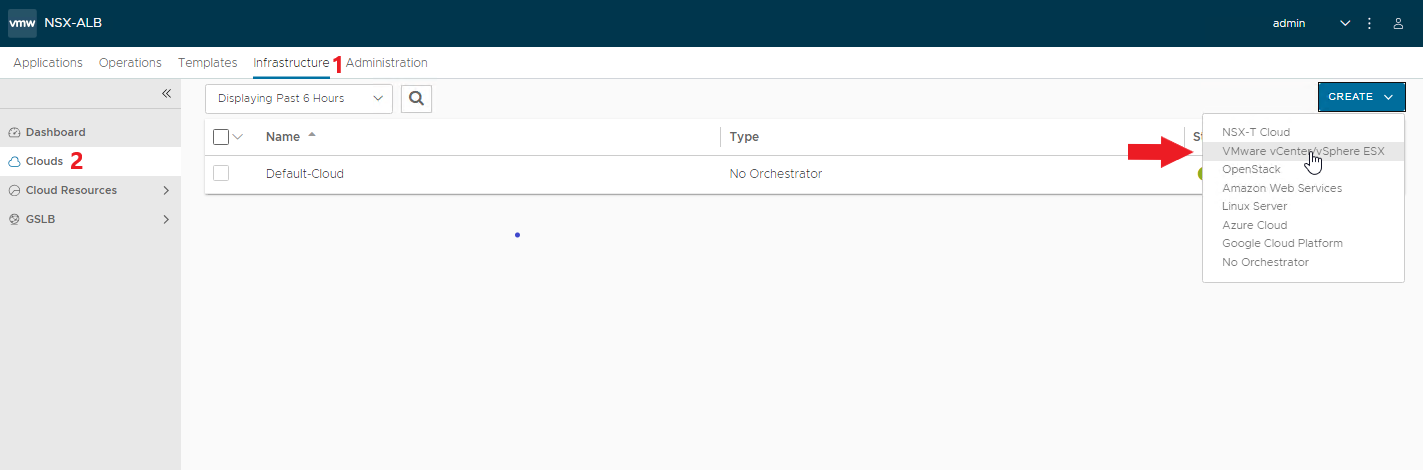
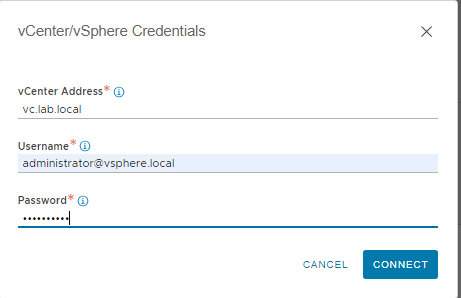
Enter the Cloud name and the vcenter connection data

Select the Datacenter, the Content Library if any. SAVE & RELAUNCH

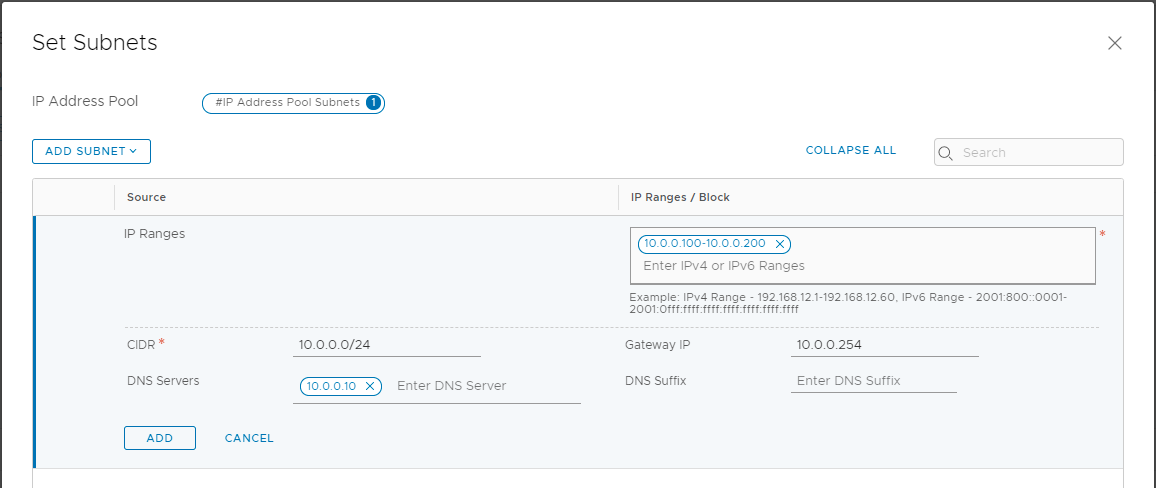
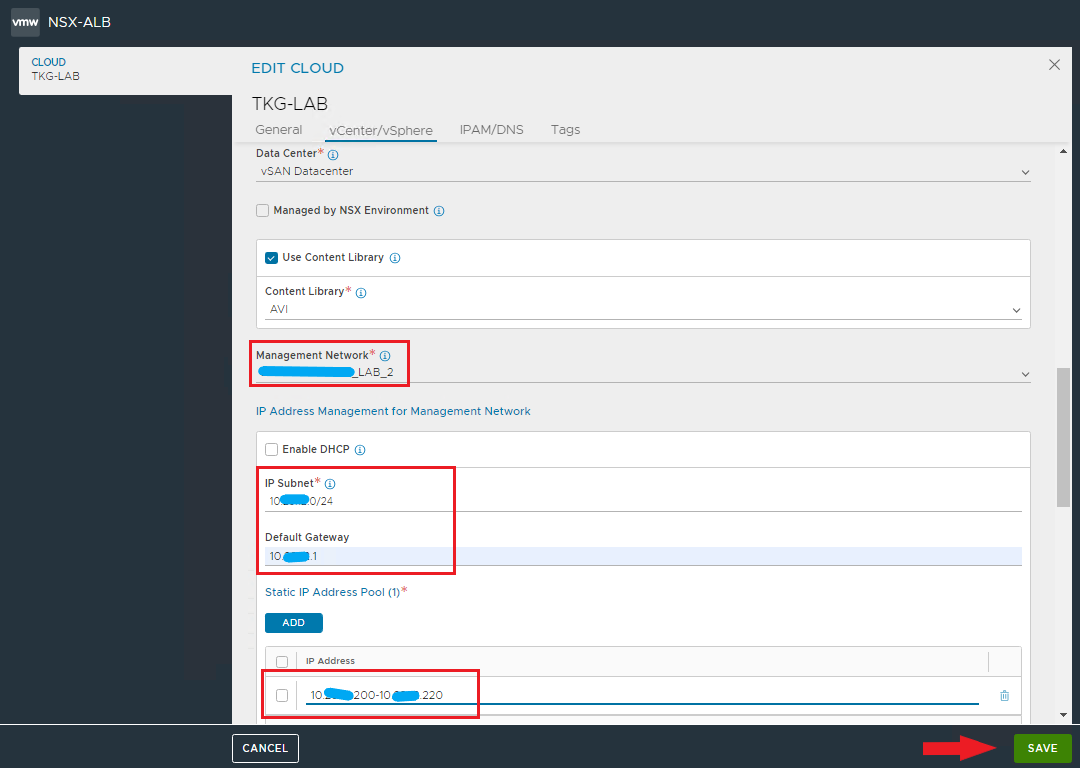
Select management network, subnet, defaut GW and specify the pool for assigning static ip address to Service Engines.

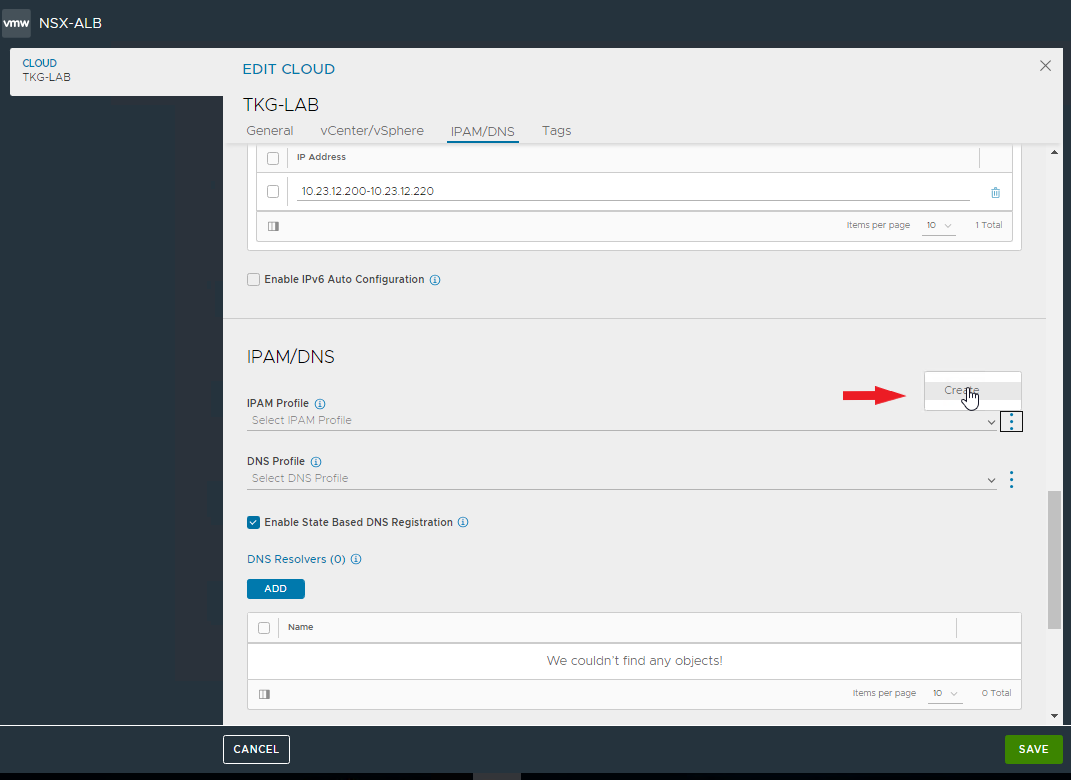
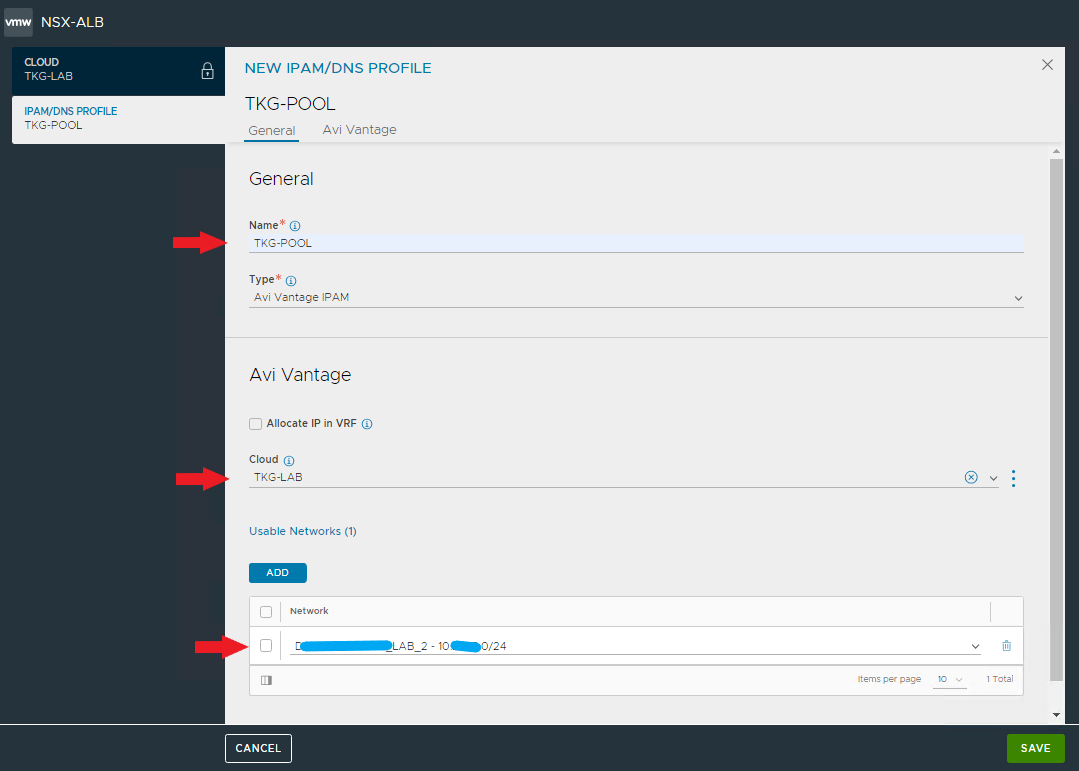
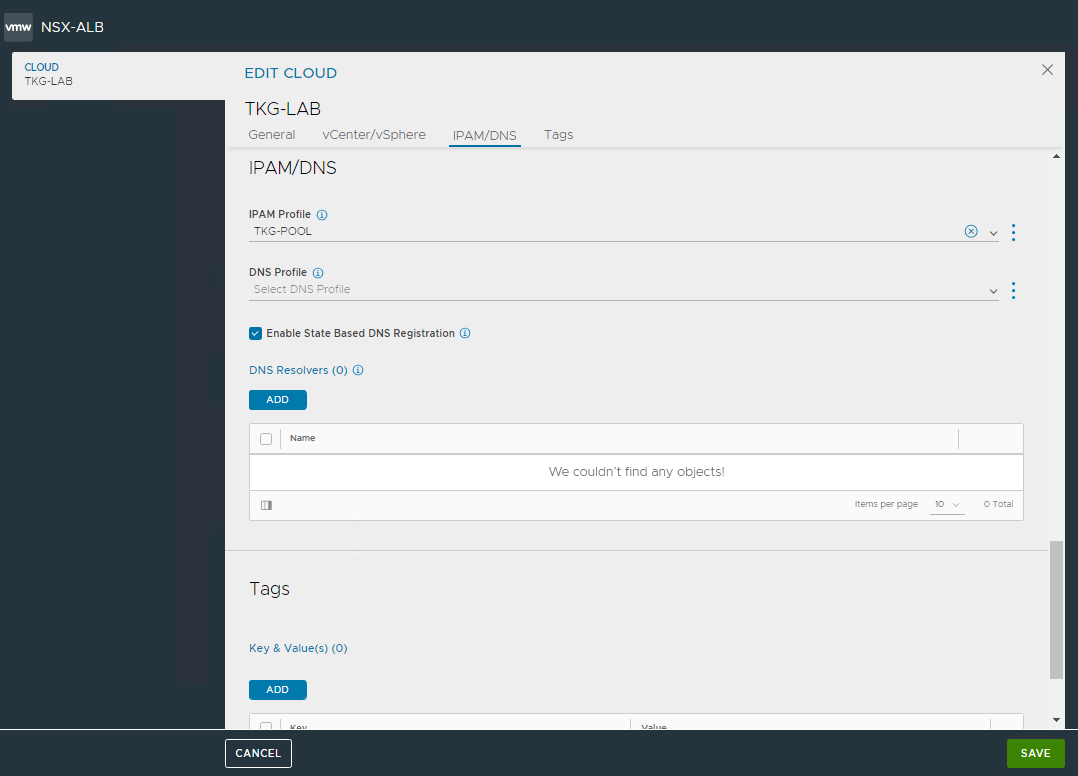
Create the IPAM profile that will be used for the VIPs required by the Tanzu clusters.

Save and return to the creation of Cloud zone. Confirm creation as well.

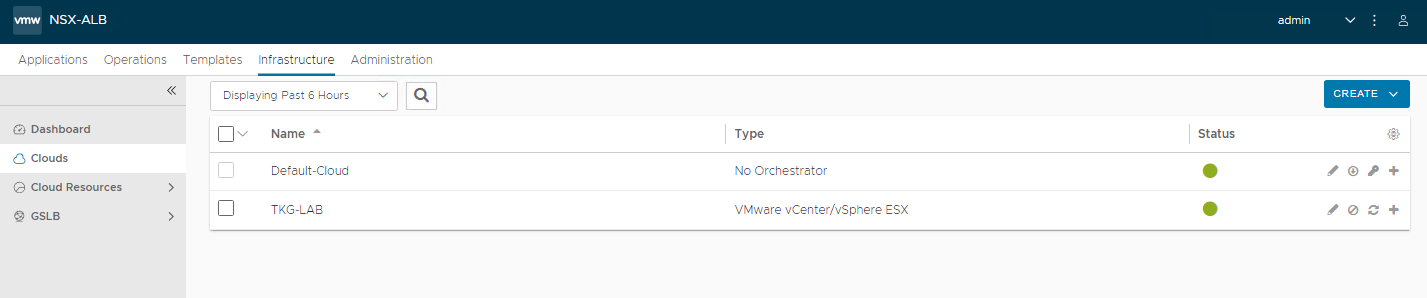
Cloud zone appears in the list, verify that it is online (green dot)

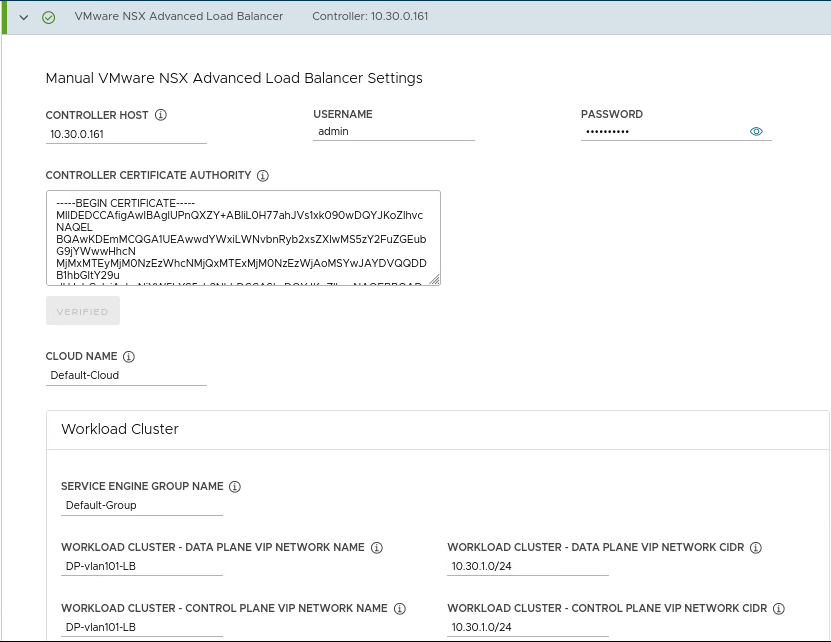
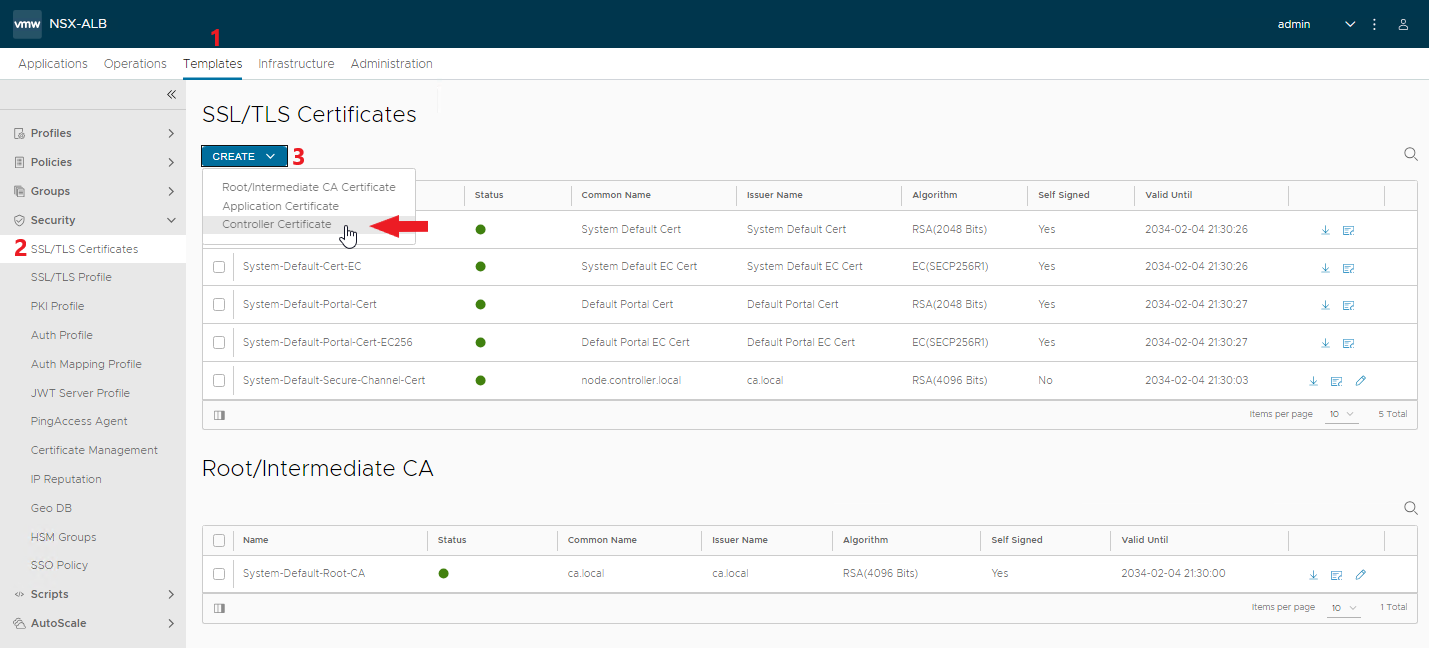
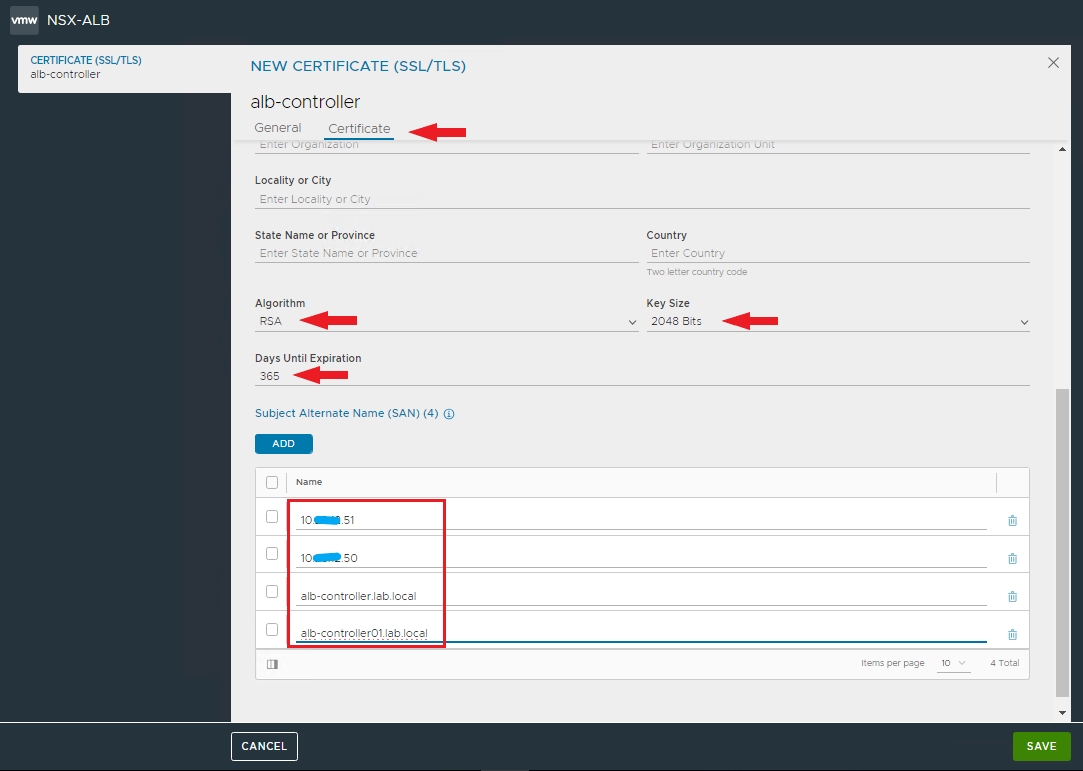
Generate a controller SSL certificate, it is the one used in the Tanzu standalone management cluster creation wizard

Enter the name and Common Name of the certificate, careful that it reflects the actual DNS record (FQDN) used by Tanzu to access the AVI controller. Enter all the necessary fields.

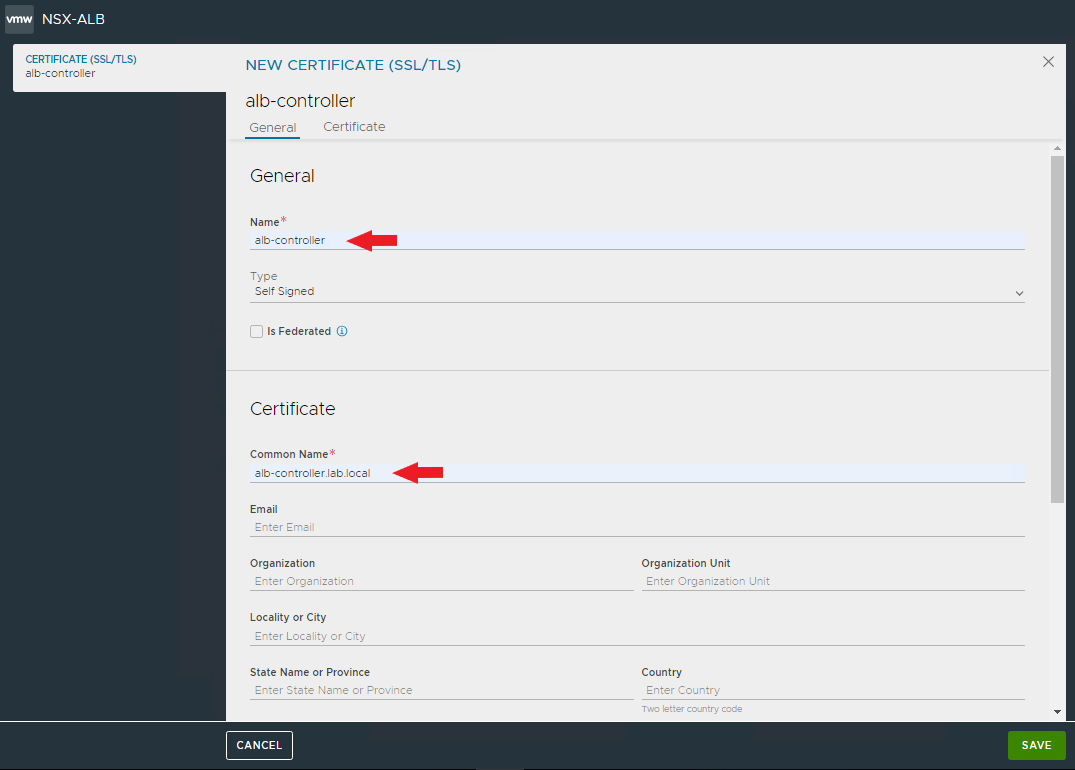
Complete the certificate with days of validity (365 or more if you want) and insert all the Subject Alternate Names with which the certificate can be invoked (IP addresses of the VIP and controllers, also include the FQDNs of the individual controllers)

The certificate will be used to access the controller VIP, set it for access.

Enable HTTP and HTTPS access as well as redirect to HTTPS.

Delete the current certificates and select the newly created one.

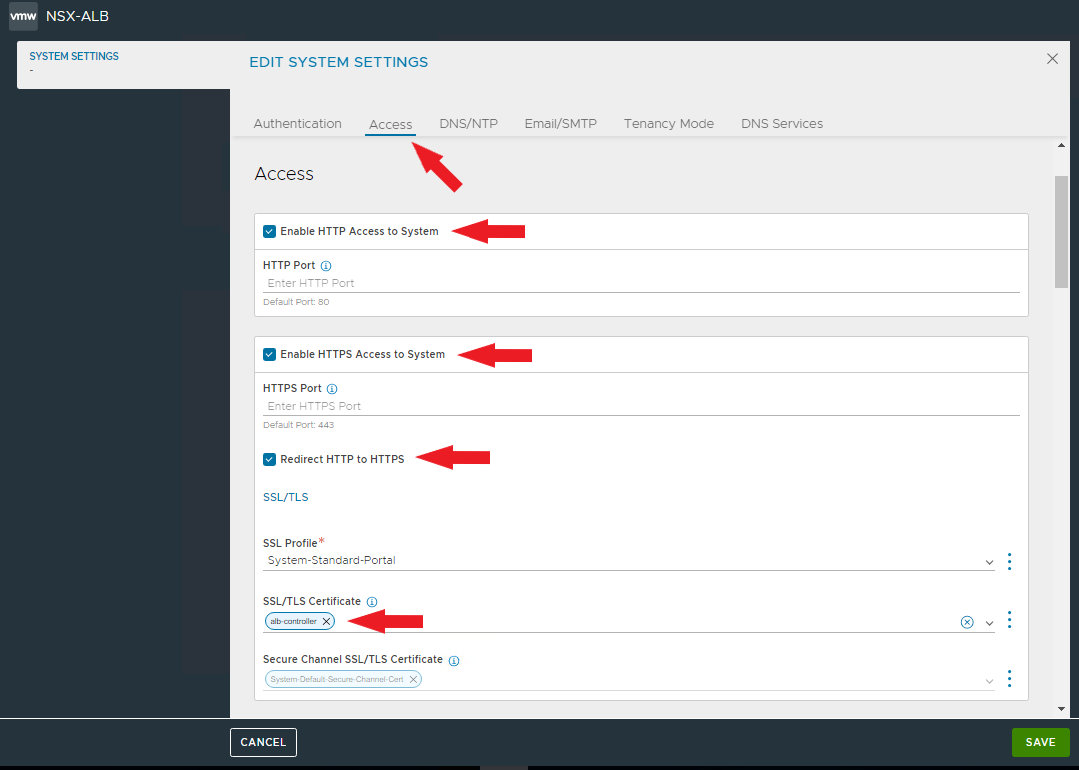
NOTE: applied the new certificate will need to reconnect to the controller

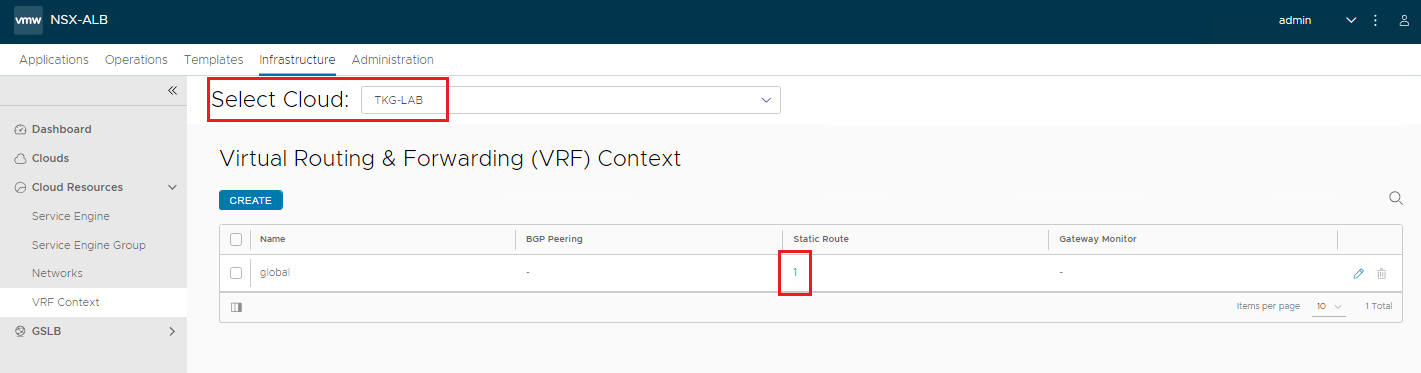
It remains to enter the default route for traffic leaving the VRF associated with our Cloud zone.

NOTE: verify that our Cloud zone is selected in the Select Cloud field.

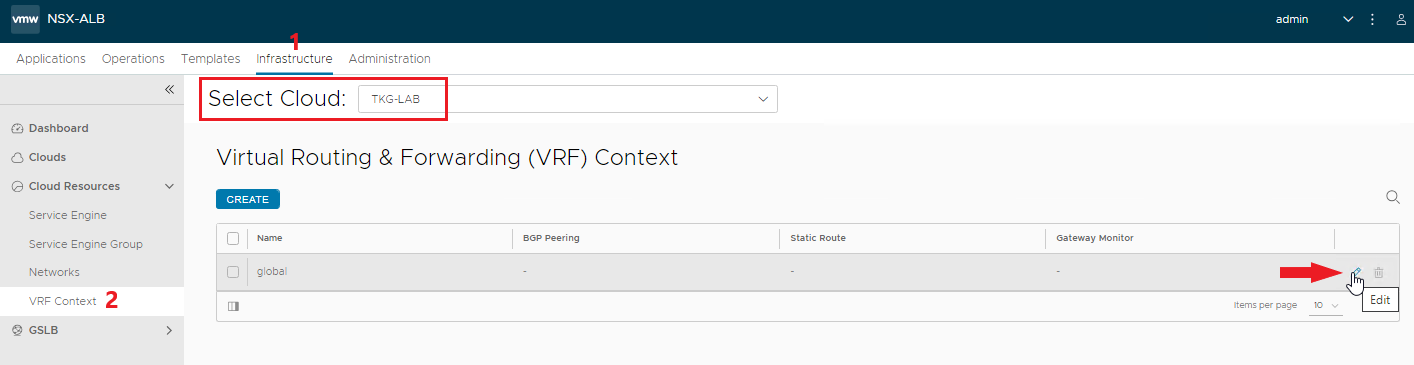
Enter the default GW for all outgoing traffic

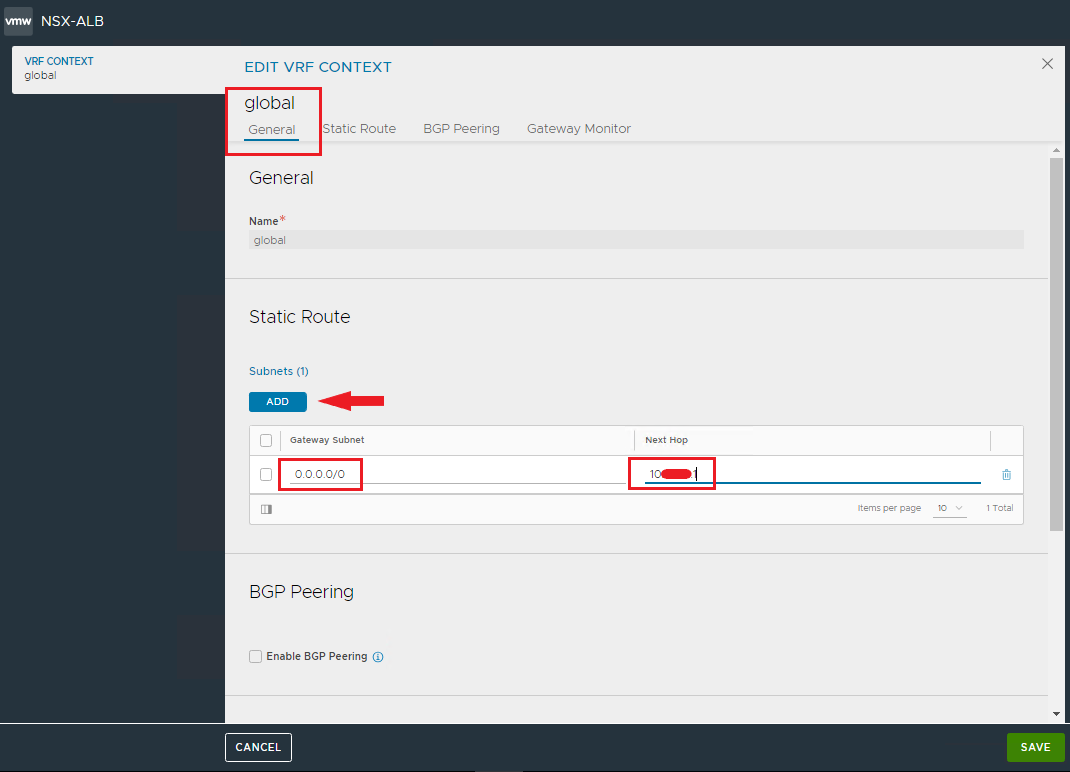
Check that the route is present

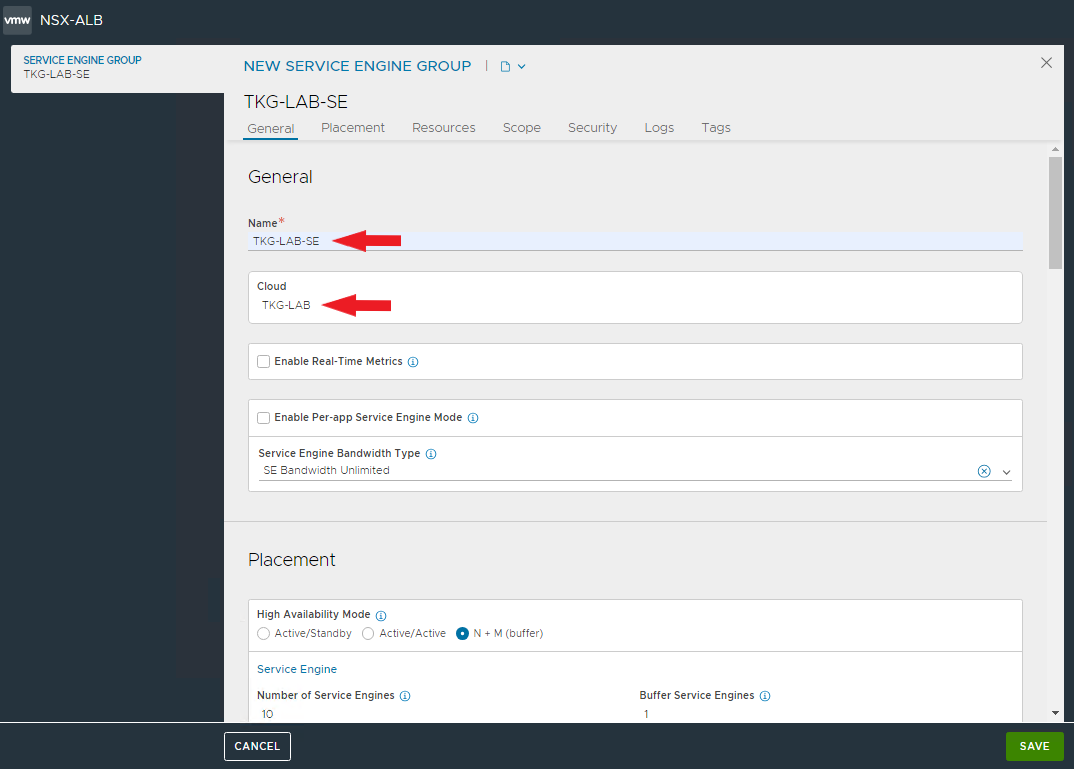
Complete our configuration by creating a Service Engine Group to be used for Tanzu. This will allow us to customize the configurations of the SEs used for Tanzu.

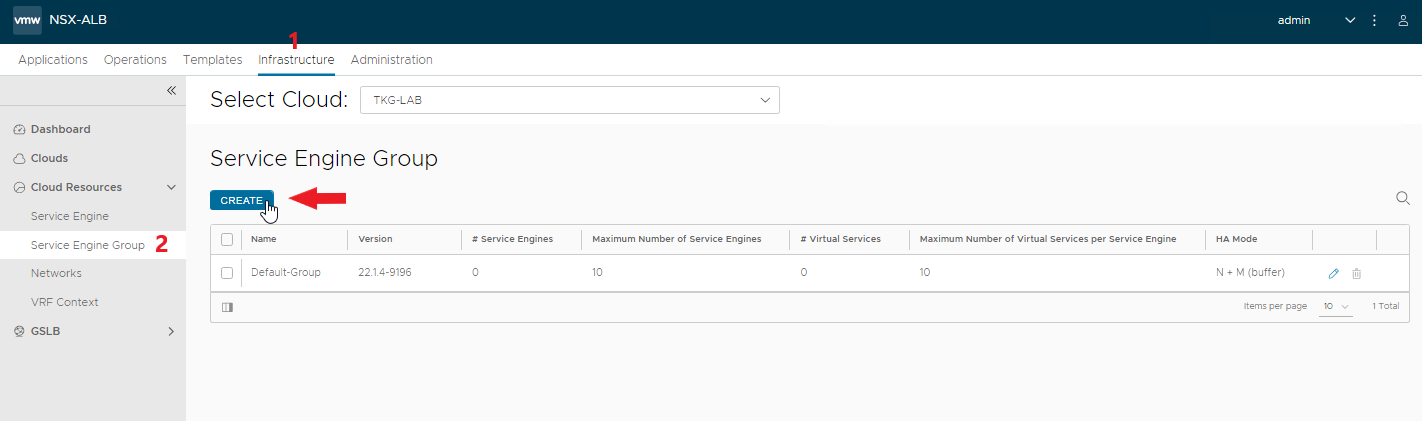
Enter the name and select the cloud zone.

Finally we have an ALB loadbalancer ready to serve our Tanzu clusters ๐Ÿ™‚

Posted in ALB, nsx, tanzu, vmug | Tagged , , , | Comments Off on Deploy NSX ALB for TKG Standalone

ESXi Network Tools

Sometimes it happens to troubleshoot an ESXi host for network problems.

Over time I created a small guide to help me remember the various commands, I share it hoping it will be useful to everyone ๐Ÿ™‚

esxcli network (here the complete list)

Check the status of firewall

esxcli network firewall get
Default Action: DROP
Enabled: true
Loaded: true

Enabling and disabling firewall

esxcli network firewall set --enabled falseย  (firewall disabled)

esxcli network firewall set --enabled true (firewall enabled)

TCP/UDP connection status

esxcli network ip connection list
Proto Recv Q Send Q Local Address                   Foreign Address       State       World ID CC Algo World Name
----- ------ ------ ------------------------------- --------------------- ----------- -------- ------- ----------
tcp        0      0 127.0.0.1:80                    127.0.0.1:28796       ESTABLISHED  2099101 newreno envoy
tcp        0      0 127.0.0.1:28796                 127.0.0.1:80          ESTABLISHED 28065523 newreno python
tcp        0      0 127.0.0.1:26078                 127.0.0.1:80          TIME_WAIT          0
tcp        0      0 127.0.0.1:8089                  127.0.0.1:60840       ESTABLISHED  2099373 newreno vpxa-IO
<line drop>

Configured DNS servers and search domain

esxcli network ip dns server list

DNSServers: 10.0.0.8, 10.0.0.4

esxcli network ip dns search list

DNSSearch Domains: scanda.local

List of vmkernel interfaces

esxcli network ip interface ipv4 get
Name IPv4 Address   IPv4 Netmask  IPv4 Broadcast Address Type Gateway      DHCP DNS
---- -------------- ------------- -------------- ------------ ------------ --------
vmk0 172.16.120.140 255.255.255.0 172.16.120.255 STATIC       172.16.120.1 false
vmk1 172.16.215.11  255.255.255.0 172.16.215.255 STATIC       172.16.215.1 false

Netstacks configured on host (used on vmkernel interfaces)

esxcli network ip netstack list
defaultTcpipStack
Key: defaultTcpipStack
Name: defaultTcpipStack
State: 4660

vmotion
Key: vmotion
Name: vmotion
State: 4660

List of physical network adapters

esxcli network nic list
Name   PCI Device   Driver  Admin Status Link Status Speed Duplex MAC Address       MTU  Description
------ ------------ ------- ------------ ----------- ----- ------ ----------------- ---- -----------
vmnic0 0000:04:00.0 ntg3    Up           Down        0     Half   ec:2a:72:a6:bf:34 1500 Broadcom Corporation NetXtreme BCM5720 Gigabit Ethernet
vmnic1 0000:04:00.1 ntg3    Up           Down        0     Half   ec:2a:72:a6:bf:35 1500 Broadcom Corporation NetXtreme BCM5720 Gigabit Ethernet
vmnic2 0000:51:00.0 bnxtnet Up           Up          25000 Full   00:62:0b:a0:b2:c0 1500 Broadcom NetXtreme E-Series Quad-port 25Gb OCP 3.0 Ethernet Adapter
vmnic3 0000:51:00.1 bnxtnet Up           Up          25000 Full   00:62:0b:a0:b2:c1 1500 Broadcom NetXtreme E-Series Quad-port 25Gb OCP 3.0 Ethernet Adapter
vmnic4 0000:51:00.2 bnxtnet Up           Up          25000 Full   00:62:0b:a0:b2:c2 1500 Broadcom NetXtreme E-Series Quad-port 25Gb OCP 3.0 Ethernet Adapter
vmnic5 0000:51:00.3 bnxtnet Up           Up          25000 Full   00:62:0b:a0:b2:c3 1500 Broadcom NetXtreme E-Series Quad-port 25Gb OCP 3.0 Ethernet Adapter

vmkpingย (KB reference)

command to send ICMP packets through vmkernel interfaces, very useful for checking MTU ๐Ÿ™‚

usage examples

ping an host
vmkping -I vmk0 192.168.0.1

check MTU and fragmentation
vmkping -I vmk0 -d -s 8972 172.16.100.1

ping an host using vmotion netstack
vmkping -I vmk2 -S vmotion 172.16.115.12

iperf ( good article here)

Very useful tool to check the actual usable bandwidth between 2 hosts, one host uses server mode and one uses client mode

the tool is located at this path

/usr/lib/vmware/vsan/bin/iperf3

NOTE: in vSphere 8 you may get ” Operation not permitted” error at runtime, you can enable the execution with the command

esxcli system secpolicy domain set -n appDom -l disabled

then enforcing with

esxcli system secpolicy domain set -n appDom -l enforcing

it is also necessary to disable the firewall to perform the tests

esxcli network firewall set --enabled false

usage example:

host server mode, the -B option allows a specific address and interface to be used for testing

 /usr/lib/vmware/vsan/bin/iperf3 -s -B 172.16.100.2

client mode host, the -n option specifies the amount of data to be transferred for testing

/usr/lib/vmware/vsan/bin/iperf3 -n 10G -c 172.16.100.2

25G interface test result

[ ID] Interval        Transfer    Bitrate        Retr
[  5]   0.00-4.04 sec 10.0 GBytes 21.3 Gbits/sec 0    sender
[  5]   0.00-4.04 sec 10.0 GBytes 21.3 Gbits/sec      receiver

NOTE : at the end of the test remember to re-enable the firewall and enforcing ๐Ÿ™‚

nslookup e cache DNSย (KB reference)

Sometimes it is necessary to verify that DNS name resolution is working properly on a host.

Use the nslookup command followed by the name to resolve

nslookup www.scanda.it

It may happen that changes to DNS records are not immediately received by esxi hosts, this is due to the DNS query caching mechanism.

To clear the DNS cache, use the following commandย (KB reference)

/etc/init.d/nscd restart

TCP/UDP connectivity test

On the esxi hosts, netcat (nc) tool is present to verify TCP/UDP connectivity to another host.

nc
usage: nc [-46DdhklnrStUuvzC] [-i interval] [-p source_port]
[-s source_ip_address] [-T ToS] [-w timeout] [-X proxy_version]
[-x proxy_address[:port]] [hostname] [port[s]]

If you need to verify access to an HTTPS service and the validity of its SSL certificate, you can use the command

openssl s_client -connect www.dominio.it:443

pktcap-uwย (KB reference)

another very useful tool is pktcap-uw, which allows you to capture network traffic in full tcpdump style. The tool differs from tcpdump-uw in that it can capture traffic not only from vmkernel interfaces, but also from physical interfaces, switchports, and virtual machines.

let’s look at a few examples

capturing traffic from the vmkernel vmk0

pktcap-uw --vmk vmk0

traffic capture from physical uplink vmnic3

pktcap-uw --uplink vmnic3

Capturing traffic from a virtual switch port

pktcap-uw --switchport <switchportnumber>

NOTE: To get the port number mapping and virtual nic of a VM use the command net-stats -l

It is also possible to retrieve information from the LLDP protocol from uplinks used by a VSS ( do not support LLDP) with the following command

pktcap-uw --uplink vmnic1 --ethtype 0x88cc -c 1 -o /tmp/lldp.pcap > /dev/null && hexdump -C /tmp/lldp.pcap

The output will be in hexadecimal format and may be useful for performing port mapping of a host even on a Virtual Standard Switch.

I will not fail to update the list with other useful commands.


Posted in esxi, networking, troubleshooting, vmug, vsphere | Tagged , , , , | Comments Off on ESXi Network Tools

Deploy TKG Standalone Cluster – part 2

Here is the second article, find the first one at this link.

Now that the bootstrap machine is ready we can proceed with the creation of the standalone cluster.

Let’s connect to the bootstrap machine and run the command that starts the wizard.

NOTE: by default the wizard is started on the loopback, if you want to reach it externally you only need to specify the –bind option with the ip of a local interface.

tanzu management-cluster create --ui 
or
tanzu management-cluster create --ui --bind 10.30.0.9:8080

By connecting with a browser to the specified address we will see the wizard page.

Select the cluster type to deploy, in this case vSphere.

NOTE: the SSH key is the one generated in the first part, bring it back correctly ( the image is missing ssh-rsa AAAAB3N… )

Deploy TKG Management Cluster

Select the controlplane type, node size and balancer

NOTE: In this case I chose to use NSX ALB which must have already been installed and configured

Enter the specifications for NSX ALB

Insert any data in the Metadata section

Select the VM folder, Datastore, and cluster to be used for deployment

Select the Kubernetes network

If needed, configure the identity provider

Select the image to be used for the creation of the cluster nodes.

NOTE: is the image previously uploaded and converted as a template

Select whether to enable CEIP

Deployment begins, follow the various steps and check for errors

Deployment takes time to create

It is now possible to connect to the cluster from the bootstrap machine and check its working

tanzu mc get

Download and install the Carvel tools on the bootstrap machine

Installation instructions can be found in the official documentation

Verify that the tools have been properly installed

Now we can create a new workload cluster.

After the management cluster is created, we find its definition file at the path ~/.config/tanzu/tkg/clusterconfigs
The file has a randomly generated name ( 9zjvc31zb7.yaml ), it is then converted to a file with the specifications for creating the cluster ( tkgvmug.yaml )

Make a copy of the file 9zjvc31zb7.yaml giving the name of the new cluster to be created ( myk8svmug.yaml )

Edit the new file by changing the CLUSTER_NAME variable by entering the name of the new cluster

Launch the command to create the new cluster

tanzu cluster create --file ~/.config/tanzu/tkg/clusterconfigs/myk8svmug.yaml

connect to the new cluter

tanzu cluster kubeconfig get --admin myk8svmug
kubectl config get-contexts
kubectl config use-context myk8svmug-admin@myk8svmug

We can now install our applications in the new workload cluster


Posted in kubernetes, tanzu | Tagged , | Comments Off on Deploy TKG Standalone Cluster – part 2

Deploy TKG Standalone Cluster – part 1

I had the pleasure of attending the recent Italian UserCon with a session on Tanzu Kubernetes Grid and the creation of a standalone management cluster. Out of this experience comes this series of posts on the topic.

As mentioned above this series of articles is on TKG Standalone version 2.4.0, it should be pointed out that the most common solution to use is TKG Supervisor (refer to theย  official documentation)

But then when does it make sense to use TKG Standalone?

  • When using AWS or Azure
  • When using vSphere 6.7 (vsphere with Tanzu has only been introduced since version 7)
  • When using vSphere 7 and 8 but need the following features : Windows Containers, IPv6 dual stack, and the creation of cluster workloads on remote sites managed by a centralized vcenter server

Let’s look at the requirements for creating TKG Standalone:

  • a bootstrap machine
  • vSphere 8, vSphere 7, VMware Cloud on AWS, or Azure VMware Solution

I have reported only the main requirements, for all details please refer to the official link

Management Cluster Sizing

Below is a table showing what resources to allocate for management cluster nodes based on the number of workload clusters to be managed.

In order to create the management cluster, it is necessary to import the images to be used for the nodes; the images are available from the vmware site downlaods.

I recommend using the latest available versions:

  • Ubuntu v20.04 Kubernetes v1.27.5 OVA
  • Photon v3 Kubernetes v1.27.5 OVA

Once the image has been imported, it is necessary to convert it to a template.

Creating bootstrap machine

Maybe that is the funniest part ๐Ÿ™‚ I chose a Linux operating system, specifically Ubuntu server 20.04.

Recommended requirements for the bootstrap machine are as follows : 16GB RAM, 4 cpu and at least 50GB disk space.

Here are the details of mine

Update to the latest available package

sudo apt update
sudo apt upgrade

Important! synchronize time via NTP.

If you are using the bootstrap machine in an isolated environment, it is useful to also install the graphical environment so that you can use a browser and other graphical tools.

apt install tasksel
tasksel install ubuntu-desktop
reboot

Installare Docker

Manage Docker as a non-root user

sudo groupadd docker
sudo usermod -aG docker $USER
docker run hello-world

Configure Docker to start automatically with systemd

sudo systemctl enable docker.service
sudo systemctl enable containerd.service

Activate kind

sudo modprobe nf_conntrack

Install Tanzu CLI 2.4

Check the Product Interoperability Matrix to find which version is compatible with TKG 2.4

Once you have identified the compatible version, you can download it from vmware

Proceed to install the CLI in the bootstrap machine (as a non-root user)

mkdir tkg
cd tkg
wget https://download3.vmware.com/software/TCLI-100/tanzu-cli-linux-amd64.tar.gz
tar -xvf tanzu-cli-linux-amd64.tar.gz
cd v1.0.0
sudo install tanzu-cli-linux_amd64 /usr/local/bin/tanzu
tanzu version

Installing TKG plugins

tanzu plugin group search -n vmware-tkg/default --show-details
tanzu plugin install --group vmware-tkg/default:v2.4.0
tanzu plugin list

Download and install on the bootstrap machine the kubernetes CLI for Linux

cd tkg
gunzip kubectl-linux-v1.27.5+vmware.1.gz
chmod ugo+x kubectl-linux-v1.27.5+vmware.1
sudo install kubectl-linux-v1.27.5+vmware.1 /usr/local/bin/kubectl
kubectl version --short --client=true

Enable autocomplete for kubectl and Tanzu CLI.

echo 'source <(kubectl completion bash)' >> ~/.bash_profile

echo 'source <(tanzu completion bash)' >> ~/.bash_profile

As the last thing we generate the SSH keys to be used in the management cluster creation wizard

ssh-keygen
cat ~/.ssh/id_rsa.pub

This last operation completes the first part of the article.

The second part is available here

Posted in kubernetes, tanzu | Tagged , | Comments Off on Deploy TKG Standalone Cluster – part 1

NSX-T Upgrade

The NSX-T installation series started with 3.1.x, it’s time to upgrade to 3.2 ๐Ÿ™‚

The upgrade is completely managed by NSX Manager, let’s see the process starting from the official documentation.

The upgrade version will be 3.2.2, this is because the Upgrade Evaluation Tool is now integrated with the pre-upgrade check phase. Therefore, you will not have to deploy theย  OVF ๐Ÿ˜‰

Download the NSX 3.2.2 Upgrade Bundle from your My VMware account.

NOTE: The bundle exceeds 8GB of disk space.

I forgot, let’s verify that the vSphere version is in matrix with the target NSX-T version. My cluster is in 7.0U3, fully supported by NSX-T 3.2.2 ๐Ÿ™‚

Connect to NSX Manager via SSH and verify that the upgrade service is active.

run the command as admin user:ย  get service install-upgrade

The service is active, connect to the NSX Manager UI and go to System -> Upgrade

Select UPGRADE NSX

Upload the upgrade bundle

wait for the bundle to load (the process may take some time)

After uploading, pre-checks on the bundle begin.

Once the preliminary checks have been completed, it is possible to continue with the upgrade. Select the UPGRADE button.

Accept the license and confirm the request to start the upgrade.

Select the RUN PRE-CHECK button and then ALL PRE-CHECK.

The pre-checks begin, in case of errors it will be necessary to solve each problem until all the checks are ok.

Proceed with the Edges update by selecting the NEXT button.

Select the Edge Cluster and start the update with the START button.

The updating of the Edges that form the cluster begins, the process stops in case of success or at the first detected error.

Once the upgrade has been successfully completed, run the POST CHECKS.

If all is well continue with the upgrade of the hosts esxi. Select NEXT.

Select the cluster and start the update with the START button.

At the end of the update run the POST CHECKS.

Now it remains to update NSX Manager, select NEXT to continue.

Select START to start upgrading the NSX Manager.

The upgrade process first performs pre-checks and then continues with the Manager upgrade.

The update continues with the restart of the Manager, a note reminds that until the update is complete it will not be possible to connect to the UI.

Once the Manager has been restarted and the upgrade has been completed, it will be possible to access the UI and check the result of the upgrade. Navigate to System -> Upgrade

You can find the details of each upgrade stage. As you can see, the upgrade process is simple and structured.

Upgrade to NSX-T 3.2.2 completed successfully ๐Ÿ™‚

Posted in nsx, upgrade, vmug | Tagged , , | Comments Off on NSX-T Upgrade

Create host transport nodes

Last article in the series is about preparing esxi hosts to turn them into Trasnport Nodes.

First you need to create some profiles to be used later for preparing hosts.

From the Manager console, move to System -> Fabric -> Profiles -> Uplink Profiles.

Select + ADD PROFILE

Enter the name of the uplink profile, if not using LAG (LACP) move to the next section.

Select the Teaming Policy (default Failover Order) and enter the name of the active uplink. Enter the VLAN ID, if any, to be used for the overlay network and the MTU value.

Move to Transport Node Profiles.

Select + ADD PROFILE

Enter the name of the profile, select the type of Distributed switch (leave the Standard mode), select the Compute Manager and the related Distributed switch.

In the Transport Zone section indicate the transport zones to be configured on the hosts.

Complete the profile by selecting the previously created uplink profile, the TEP address assignment methodology, and map the profile’s uplink to that of the Distribute switch.

Create the profile with the ADD button.

Move to System -> Fabric -> Host Transport Nodes.

Under Managed By select the Compute Manager with the vSphere cluster to be prepared.

Select the cluster and CONFIGURE NSX.

Select the Transport Node profile you have just created and give APPLY.

Start the installation and preparation of the cluster nodes.

Wait for the configuration process to finish successfully and for the nodes to be in the UP state.

Our basic installation of NSX-T can finally be considered completed ๐Ÿ™‚

From here we can start configuring the VM segments and the dynamic routing part with the outside world as well as all the other security aspects!

Posted in nsx, vmug | Tagged , | Comments Off on Create host transport nodes

Create an NSX Edge cluster

Now that we have created our Edges we need to associate them with a new Edge Cluster.

From the Manager Console navigate to System -> Fabric -> Nodes -> Edge Cluster.

Select + ADD EDGE CLUSTER

Enter the name of the new Edge Cluster, the profile is proposed automatically.

In the section below, select the previously created Edges and move them within the cluster with the right arrow. Give confirmation of creation with the ADD button.

The cluster is listed with some of its characteristics.

Now that the cluster has been created it will be possible to create a T0 gateway to be used for external connectivity.

From the Manager console navigate toย  Networking-> Tier-0 Gateways .

Select + ADD GATEWAY -> Tier-0

Enter the name of the new T0 gateway, the HA mode and associate the newly created Edge Cluster. It is not a mandatory field but necessary if we want to connect our segments to the physical world. Through the Edges it will be possible to define interfaces with which to allow the T0 to do BGP peering with external ToRs.

After creating the T0 with the SAVE button, we can close the editing by selecting NO.

A few seconds and the new T0 will be ready for use!

Posted in nsx, vmug | Tagged , | Comments Off on Create an NSX Edge cluster

Install NSX Edges

Core components of NSX are Edges that provide functionality such as routing and connecting to the outside world, NAT services, VPN, and more.

Let’s briefly see the requirements necessary for their installation.

Appliance SizeMemoryvCPUDisk SpaceNotes
NSX Edge Small4GB2200GBlab and proof-of-concept deployments
NSX Edge Medium8GB4200GBSuitable for NAT, routing, L4 firewall and throughput less than 2 Gbps
NSX Edge Large32GB8200GBSuitable for NAT, routing, L4 firewall, load balancer and throughput up to 10 Gbps
NSX Edge Extra Large64GB16200GBSuitable when the total throughput required is multiple Gbps for L7 load balancer and VPN

As can be understood from the table, it is necessary to know in advance the services that will be configured on the edges and the total traffic throughput.

For production environments it is necessary to use at least the size Medium.

NSX Edge is only supported on ESXi with Intel and AMD processors (this is to support DPDK)

If EVC is used, the minimum supported generation is Haswell.

Having made the appropriate sizing considerations, you can proceed to install the Edge.

From the Manager console, move to System -> Fabric -> Nodes -> Edge Transport Nodes.

Select + ADD EDGE NODE

Insert the necessary information to complete the wizard.

For the lab the small version is sufficient, remember to verify that the FQDN was created as a record on DNS.

Enter the credentials of the admin, root, and audit user, if used.

In this case I have enabled the flags that allow admin and root access via SSH, this in order to be able to perform direct checks on the edge.

Select the compute manager to which the Edge will be deployed. Indicate the cluster and all the necessary information.

Enter information about the Management Network configurations, this is the network under which NSX Manager will configure and manage the Edge. The IP address must match the FQDN entered on the first page of the wizard.

As a last configuration, it is necessary to indicate which Transport Zone will be associated with the virtual switch to which the edge is connected. Specify the uplink profile, the TEP address assignment method, and the interface/portgroup to associate with the uplink.

This is the last page of the wizard, if all the information has been entered correctly the deployment of the edge will begin.

In the same way it is possible to create other edges to be used later for the creation of an Edge Cluster.

Posted in nsx, vmug | Tagged , | Comments Off on Install NSX Edges

NSX Create transport zones

We continue our journey on NSX adding other pieces to our installation.

Let’s define the Transport Zones to which we are going to connect the transport nodes and edges. Normally two Transport Zones are defined.

Connect to the Manager console and move to System -> Fabric -> Transport Zones.

Select + ADD ZONE and create an Overlay transport zone.

In the same way we also create a transport zone of type VLAN.

In the summary we will now have our two Transport Zones.

Proceed to create uplink profiles to be used on transport nodes and edges.

Go to System -> Fabric -> Profiles, select + to add new profiles.

Enter the name of the profile and complete the Teamings section specifying the Teaming Policy and Uplinks.

This is the profile for transport nodes (ESXi)

By default the Teaming Policy Failover is proposed, I have specified the name of the two uplinks (they will be used later in the configuration of the transport nodes).

Add the VLAN that will be used to transport the overlay traffic.

Also create the profile for the edges.

In this case I have not configured the standby uplink and the transport VLAN, the edges are virtual appliances connected to port groups. The redundancy and tagging of the VLANs is delegated to the VDS.

Define IP Pools to be used for VTEP assignment to edges and transport nodes.

Go to Networking -> IP Management -> IP Address Pools and select ADD IP ADDRESS POOL.

Specify the name and define the subnet.

In the same way we configure the IP pool to be used for the edges, of course it will use a different subnet.

NOTE: the two newly configured subnets must be routed between them and allow an MTU of at least 1600. This is to allow connectivity between transport nodes and edges.

We now have all the elements to configure Edges and Transport nodes ๐Ÿ™‚

Posted in nsx, vmug | Tagged , | Comments Off on NSX Create transport zones

NSX finalize the installation

First login done!

Let’s complete some basic configurations now.

First let’s load the licenses, the NSX-T has a limited functionality license by default.

Let’s install a valid license to enable the features we are interested in.

It is possible to use a 60-day evaluation license, you can request it at this link.

Go to System -> Appliances

For production environments it is recommended to deploy 2 other managers to form a management cluster, I leave you to try the wizard to add them (it is not necessary to do it from the vcenter). It is possible to configure a virtual IP that will always be assigned to the master node.

We can see some messages indicating that a compute manager has not yet been configured and not even the configurations backup.

The compute manager is the vcenter that manages the esxi nodes that will be prepared as transport nodes.

Click on COMPUTE MANAGER and then on + ADD COMPUTE MANAGER

accept the vcenter thumbprint

wait for the vcenter to register successfully with the manager

now we can see the hosts by going under System -> Fabric -> Nodes, select the newly added vcenter on Managed By and the nodes will appear.

It remains only to configure the backup! Let’s go to System -> Backup & Restore

Currently the only supported mode is the copy via SFTP, please enter the necessary parameters.

Of course, it is possible to schedule the backup process according to your needs.

In case of loss or corruption of the manager it will be possible to re-deploy the appliance passing the backup path for a quick restore.

This completes the basic configuration of our manager ๐Ÿ™‚

Posted in nsx, vmug | Tagged , | Comments Off on NSX finalize the installation